
User Manual

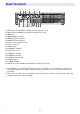
Table Of Contents
- Contents
- Projector Overview
- Operation During Projection
- Configuring Advanced Projector Settings
- Basic Setup Menu Operations
- Password Protecting the Projector
- Restoring Projector Settings to Their Initial Factory Defaults
- Setup Menu Contents
- Image Adjustment 1 Main Menu
- Image Adjustment 2 Main Menu
- Volume Adjustment Main Menu
- Screen Settings Main Menu
- Input Settings Main Menu
- Option Settings 1 Main Menu
- Option Settings 2 Main Menu
- Wired LAN Settings Main Menu (USB Port Models Only)
- USB Settings Main Menu (USB Port Models Only)
- Operational Info Main Menu
- Restore All Defaults Main Menu
- Cleaning the Projector
- Error Indicators and Warning Messages
- Appendix
- Connecting to a Video Device
- Connecting the HDMI Output of a Video Device or Computer to the Projector
- Remote Controller Signal Range
- Hanging the Projector from a Ceiling
- Projection Distance and Screen Size
- Aspect Ratio Setting and Projection Image
- Supported Signals
- Using Wired LAN to Control the Projector (XJ-H1650, XJ-H1750, XJ-ST145, XJ-ST155)
- Projector RS-232C Control
- Specifications

9
1 USB-A port (XJ-H1650/XJ-H1750/XJ-ST145/XJ-ST155 only)
2 LAN port (XJ-H1650/XJ-H1750/XJ-ST145/XJ-ST155 only)
3 HDMI port
4 MONITOR OUT terminal
5 COMPUTER IN 1 terminal
6 COMPUTER IN 2 terminal
7 Remote control signal receiver
8 Power connector
9 SERIAL port*
1
bk AUDIO OUT terminal
bl Anti-theft lock hole
bm AUDIO IN 1 terminal
bn AUDIO IN 2 terminal
bo AUDIO IN L/R terminals
bp VIDEO terminal
bq S-VIDEO terminal
br USB-B port*
2
(XJ-H1650/XJ-H1750/XJ-ST145/XJ-ST155 only)
Back Terminals
*1 This terminal is for controlling the projector from an external device. It normally is not used. For
information about using control commands and other details, See “Projector RS-232C Control”
(page 60).
*2 This port is for USB connection between the projector and a computer when using the optionally
available interactive pointer (YA-P10).
87 9 bkbl bm bn bp bq brbo
123 4 5 6
D