
User Manual

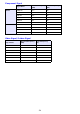
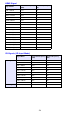

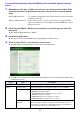


Table Of Contents
- Contents
- Projector Overview
- Operation During Projection
- Configuring Advanced Projector Settings
- Basic Setup Menu Operations
- Password Protecting the Projector
- Restoring Projector Settings to Their Initial Factory Defaults
- Setup Menu Contents
- Image Adjustment 1 Main Menu
- Image Adjustment 2 Main Menu
- Volume Adjustment Main Menu
- Screen Settings Main Menu
- Input Settings Main Menu
- Option Settings 1 Main Menu
- Option Settings 2 Main Menu
- Wired LAN Settings Main Menu (USB Port Models Only)
- USB Settings Main Menu (USB Port Models Only)
- Operational Info Main Menu
- Restore All Defaults Main Menu
- Cleaning the Projector
- Error Indicators and Warning Messages
- Appendix
- Connecting to a Video Device
- Connecting the HDMI Output of a Video Device or Computer to the Projector
- Remote Controller Signal Range
- Hanging the Projector from a Ceiling
- Projection Distance and Screen Size
- Aspect Ratio Setting and Projection Image
- Supported Signals
- Using Wired LAN to Control the Projector (XJ-H1650, XJ-H1750, XJ-ST145, XJ-ST155)
- Projector RS-232C Control
- Specifications

58
Image Input Specifies the input source. The following are the available input source
options.
3D Puts the projector into the 3D input mode or normal input mode.
On: 3D input mode
Off: Normal input mode
z Note that this setting cannot be change while the currently selected
input source is “Computer 1 (Component)”, “Computer 2
(Component)”, “HDMI”, or “USB”.
Color mode Specifies the color mode.
z For details about this setting, see “Selecting the Color Mode” (page
14).
Blank Selecting “On” for this setting temporarily blocks the image from the
input source. “Off” causes the image from the input source to be
projected.
z The operation of this item is identical to that of the remote controller’s
[BLANK] key. For details, see “Momentarily Cutting Off the Input
Source Image” (page 15).
Aspect ratio Changes the aspect ratio of the projected image.
z For details about this setting, see “Changing the aspect ratio of the
projected image” (page 17).
Brightness This corresponds to the “Image Adjustment 1 J Brightness” setting of
the setup menu. Input a value into the box and then click the [Apply]
button. This will change the projector’s “Brightness” setting accordingly.
Contrast This corresponds to the “Image Adjustment 1 J Contrast” setting of the
setup menu. Input a value into the box and then click the [Apply] button.
This will change the projector’s “Contrast” setting accordingly.
Eco Mode Switches the Eco mode.
z For details about this setting, see “Eco Mode (Power Saving, Low
Noise)” (page 19).
Audio Volume Input a value into the box and then click the [Apply] button. This will
change the volume setting accordingly.
Mute Specifies the mute setting. Audio is output while “Off” is selected for this
setting, and muted when “On” is selected.
Audio Output Specifies either output from the projector’s speaker output or AUDIO
OUT terminal for audio.
Speaker: Audio output from the speaker
Line: Audio output from the AUDIO OUT terminal
Factory Defaults (Button) Clicking to return all control panel items, except for the “Projector status”
item, to their initial factory defaults.
Group Item Description
3D Off 3D On
Computer 1/2 (Auto) Computer 1/2 (RGB)
Computer 1/2 (RGB) Video
Computer 1/2 (Component) S-video
Video
S-video
HDMI
USB