
User Manual


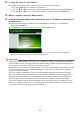
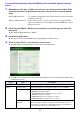


Table Of Contents
- Contents
- Projector Overview
- Operation During Projection
- Configuring Advanced Projector Settings
- Basic Setup Menu Operations
- Password Protecting the Projector
- Restoring Projector Settings to Their Initial Factory Defaults
- Setup Menu Contents
- Image Adjustment 1 Main Menu
- Image Adjustment 2 Main Menu
- Volume Adjustment Main Menu
- Screen Settings Main Menu
- Input Settings Main Menu
- Option Settings 1 Main Menu
- Option Settings 2 Main Menu
- Wired LAN Settings Main Menu (USB Port Models Only)
- USB Settings Main Menu (USB Port Models Only)
- Operational Info Main Menu
- Restore All Defaults Main Menu
- Cleaning the Projector
- Error Indicators and Warning Messages
- Appendix
- Connecting to a Video Device
- Connecting the HDMI Output of a Video Device or Computer to the Projector
- Remote Controller Signal Range
- Hanging the Projector from a Ceiling
- Projection Distance and Screen Size
- Aspect Ratio Setting and Projection Image
- Supported Signals
- Using Wired LAN to Control the Projector (XJ-H1650, XJ-H1750, XJ-ST145, XJ-ST155)
- Projector RS-232C Control
- Specifications

56
2.
Look up the projector’s IP address.
z Perform the following steps to look up the projector’s current IP address.
3.
On the computer, start up a Web browser.
4.
In the Web browser address bar, input the projector’s IP address and then press
the [Enter] key.
z If the projectors current IP address is 192.168.100.10, for example, you would input:
“http://192.168.100.10”.
z This displays the top page of the projector’s System Admin page.
z For information about what you should do next, see “To control the projector using the
Wireless Presentation System control panel” (page 57).
Important!
Under initial default settings, the projector is configured to obtain its IP address automatically
from the DHCP server. This means that an IP address will be assigned automatically whenever
the projector is connected to a DHCP environment network.
Depending on the network environment being connected to, there may be cases where you will
need to assign a projector’s IP address manually. In such cases, you will need to configure
projector’s network settings.
If you are unable to display the projector’s System Admin page with your browser using the
above procedure, it may mean that there is some problem with your network settings. Refer to
the Wireless Function Guide on the CD-ROM that comes with the projector and establish a
wireless LAN connection between the projector and your computer. After configuring the
projector’s network settings, try performing the above procedure again. For details about the
projector’s network settings, see “To configure projector’s network settings and wireless LAN
connection settings” in the Wireless Function Guide.
1. Press the [MENU] key to display the setup menu.
2. Use the [T] and [S] keys to select “Wired LAN settings” and then press the [ENTER] key.
3. Use the [T] and [S] keys to select “Wired LAN info” and then press the [ENTER] key.