
User Manual

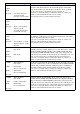


Table Of Contents
- Contents
- Projector Overview
- Operation During Projection
- Configuring Advanced Projector Settings
- Basic Setup Menu Operations
- Password Protecting the Projector
- Restoring Projector Settings to Their Initial Factory Defaults
- Setup Menu Contents
- Image Adjustment 1 Main Menu
- Image Adjustment 2 Main Menu
- Volume Adjustment Main Menu
- Screen Settings Main Menu
- Input Settings Main Menu
- Option Settings 1 Main Menu
- Option Settings 2 Main Menu
- Wired LAN Settings Main Menu (USB Port Models Only)
- USB Settings Main Menu (USB Port Models Only)
- Operational Info Main Menu
- Restore All Defaults Main Menu
- Cleaning the Projector
- Error Indicators and Warning Messages
- Appendix
- Connecting to a Video Device
- Connecting the HDMI Output of a Video Device or Computer to the Projector
- Remote Controller Signal Range
- Hanging the Projector from a Ceiling
- Projection Distance and Screen Size
- Aspect Ratio Setting and Projection Image
- Supported Signals
- Using Wired LAN to Control the Projector (XJ-H1650, XJ-H1750, XJ-ST145, XJ-ST155)
- Projector RS-232C Control
- Specifications

44
Appendix
The projector is able to project images from the composite video output, S-video output, or
component video output of a connected video device.
Important!
Always turn off the projector and the video device before connecting them.
Connection to a composite video output or S-video output
Note
Note that regardless of whether the image being projected is being input via the projector’s
S-VIDEO terminal or VIDEO terminal, the projector outputs audio that is input via the projector’s
AUDIO IN L/R terminals.
Connecting to a Video Device
To S-video output terminal
To video/audio output
terminal
Yellow: To VIDEO terminal
To S-VIDEO terminal
Red: To AUDIO IN R terminal
White: To AUDIO IN L terminal
Projector
Video device
S-video cable (commercially available)
Pin plug type video/audio cable
(commercially available)