
User Manual

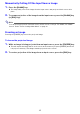
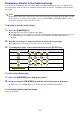


Table Of Contents
- Contents
- Projector Overview
- Operation During Projection
- Configuring Advanced Projector Settings
- Basic Setup Menu Operations
- Password Protecting the Projector
- Restoring Projector Settings to Their Initial Factory Defaults
- Setup Menu Contents
- Image Adjustment 1 Main Menu
- Image Adjustment 2 Main Menu
- Volume Adjustment Main Menu
- Screen Settings Main Menu
- Input Settings Main Menu
- Option Settings 1 Main Menu
- Option Settings 2 Main Menu
- Wired LAN Settings Main Menu (USB Port Models Only)
- USB Settings Main Menu (USB Port Models Only)
- Operational Info Main Menu
- Restore All Defaults Main Menu
- Cleaning the Projector
- Error Indicators and Warning Messages
- Appendix
- Connecting to a Video Device
- Connecting the HDMI Output of a Video Device or Computer to the Projector
- Remote Controller Signal Range
- Hanging the Projector from a Ceiling
- Projection Distance and Screen Size
- Aspect Ratio Setting and Projection Image
- Supported Signals
- Using Wired LAN to Control the Projector (XJ-H1650, XJ-H1750, XJ-ST145, XJ-ST155)
- Projector RS-232C Control
- Specifications

16
Displaying a Pointer in the Projected Image
You can select from among different pointer styles, including various arrow styles, for display in the
projected image. Pointers can be used during a presentation to indicate or highlight a specific part of
the image.
Note
Depending on the pointer style you are using, the pointer may not display properly when you are
using keystone correction. If this happens, use the [KEYSTONE +] and [KEYSTONE –] keys to
change the keystone correction value to zero.
To display a pointer in the image
1.
Press the [POINTER] key.
z This will cause a pointer to appear in the image.
z You also can use the setup menu to specify the pointer type that appears first when you press
the [POINTER] key. For details, see “Pointer” under “Option Settings 2 Main Menu” on
page 36.
2.
Use the cursor keys to move the pointer to the location you want.
z Holding down a cursor key moves the cursor at high speed.
3.
To modify the pointer as described below, press the [STYLE] key.
To select the pointer type
1.
Press the [POINTER] key to display the pointer.
2.
Keep pressing the [POINTER] key until the pointer you want is displayed.
z Each press of the [POINTER] key cycles through the available pointer types.
To clear the pointer from the image
Press the [ESC] key.
For this pointer type: Pressing [STYLE] will change it like this:
J
J
J
J
J
J
J
J
J
J
J
J
Toggle between flashing and not flashing