
User Manual

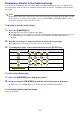


Table Of Contents
- Contents
- Projector Overview
- Operation During Projection
- Configuring Advanced Projector Settings
- Basic Setup Menu Operations
- Password Protecting the Projector
- Restoring Projector Settings to Their Initial Factory Defaults
- Setup Menu Contents
- Image Adjustment 1 Main Menu
- Image Adjustment 2 Main Menu
- Volume Adjustment Main Menu
- Screen Settings Main Menu
- Input Settings Main Menu
- Option Settings 1 Main Menu
- Option Settings 2 Main Menu
- Wired LAN Settings Main Menu (USB Port Models Only)
- USB Settings Main Menu (USB Port Models Only)
- Operational Info Main Menu
- Restore All Defaults Main Menu
- Cleaning the Projector
- Error Indicators and Warning Messages
- Appendix
- Connecting to a Video Device
- Connecting the HDMI Output of a Video Device or Computer to the Projector
- Remote Controller Signal Range
- Hanging the Projector from a Ceiling
- Projection Distance and Screen Size
- Aspect Ratio Setting and Projection Image
- Supported Signals
- Using Wired LAN to Control the Projector (XJ-H1650, XJ-H1750, XJ-ST145, XJ-ST155)
- Projector RS-232C Control
- Specifications

14
Selecting the Color Mode
You can select from among various different color mode settings in accordance with image contents
and projection conditions.
Important!
z The color mode cannot be selected in the following cases.
z The color mode cannot be selected while “On” is selected for the setup menu “Option
Settings 2 J Interactive Pointer” setting. Though the color mode change operation may be
possible on some projector models, doing so may cause problems with the optional
interactive pointer (YA-P10) in some color modes.
To change the color mode
1.
Press the [COLOR MODE] key.
z This displays the color mode selection window. The currently selected color mode is the one
whose button is selected (filled in).
2.
Use the [T] and [S] keys to move the highlighting to the color mode you want to
select, and then press the [ENTER] key.
z This will select the button next to the highlighted color mode name.
z For details on what each color mode does, see “Color Mode” under “Image Adjustment 1
Main Menu” on page 30.
3.
To hide the window, press the [ESC] key.
Zooming an Image
1.
Press the [D-ZOOM +] key.
z This will enlarge the center of the projected image one step.
2.
To zoom in on the center of the projected image more, press the [D-ZOOM +]
key again. To zoom out, press the [D-ZOOM –] key.
z Each press of [D-ZOOM +] zooms in (increases the zoom factor), while [D-ZOOM –] zooms
out. Holding down either key continuously scrolls the zoom factor.
3.
While an image is zoomed, use the [S], [T], [W], and [X] keys to scroll the view
to other parts of the image.
4.
To exit the zoom operation, press the [ESC] key.
z When “Off” is selected for the Eco Mode setting (page 19)
z When the projector is in the 3D input mode. See “3D Input Mode” (page 11).