
User Manual

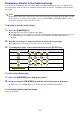


Table Of Contents
- Contents
- Projector Overview
- Operation During Projection
- Configuring Advanced Projector Settings
- Basic Setup Menu Operations
- Password Protecting the Projector
- Restoring Projector Settings to Their Initial Factory Defaults
- Setup Menu Contents
- Image Adjustment 1 Main Menu
- Image Adjustment 2 Main Menu
- Volume Adjustment Main Menu
- Screen Settings Main Menu
- Input Settings Main Menu
- Option Settings 1 Main Menu
- Option Settings 2 Main Menu
- Wired LAN Settings Main Menu (USB Port Models Only)
- USB Settings Main Menu (USB Port Models Only)
- Operational Info Main Menu
- Restore All Defaults Main Menu
- Cleaning the Projector
- Error Indicators and Warning Messages
- Appendix
- Connecting to a Video Device
- Connecting the HDMI Output of a Video Device or Computer to the Projector
- Remote Controller Signal Range
- Hanging the Projector from a Ceiling
- Projection Distance and Screen Size
- Aspect Ratio Setting and Projection Image
- Supported Signals
- Using Wired LAN to Control the Projector (XJ-H1650, XJ-H1750, XJ-ST145, XJ-ST155)
- Projector RS-232C Control
- Specifications

13
You can perform the following operations while projecting an image.
z Image brightness adjustment
z Color mode selection
z Image zooming
z Momentary cut off of the input source image and projection of a black or blue screen, or a logo
z Image freeze
z Pointer display in the projected image
z Aspect ratio switching
Adjusting Image Brightness
Note
(for USB port model users)
Use the setup menu (page 21) to adjust image brightness when the input source is an external
device connected to the USB-A port.
To adjust image brightness
1.
Press the [BRIGHT] key.
z This displays the brightness adjustment window.
2.
Use the [W] and [X] keys to adjust image brightness.
3.
To hide the window, press the [ESC] key.
Image Operations During Projection