
User Manual

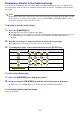


Table Of Contents
- Contents
- Projector Overview
- Operation During Projection
- Configuring Advanced Projector Settings
- Basic Setup Menu Operations
- Password Protecting the Projector
- Restoring Projector Settings to Their Initial Factory Defaults
- Setup Menu Contents
- Image Adjustment 1 Main Menu
- Image Adjustment 2 Main Menu
- Volume Adjustment Main Menu
- Screen Settings Main Menu
- Input Settings Main Menu
- Option Settings 1 Main Menu
- Option Settings 2 Main Menu
- Wired LAN Settings Main Menu (USB Port Models Only)
- USB Settings Main Menu (USB Port Models Only)
- Operational Info Main Menu
- Restore All Defaults Main Menu
- Cleaning the Projector
- Error Indicators and Warning Messages
- Appendix
- Connecting to a Video Device
- Connecting the HDMI Output of a Video Device or Computer to the Projector
- Remote Controller Signal Range
- Hanging the Projector from a Ceiling
- Projection Distance and Screen Size
- Aspect Ratio Setting and Projection Image
- Supported Signals
- Using Wired LAN to Control the Projector (XJ-H1650, XJ-H1750, XJ-ST145, XJ-ST155)
- Projector RS-232C Control
- Specifications
12
Returning to the Normal Input Mode from the 3D Input Mode
1.
Press the [INPUT] key to display the input source selection screen.
2.
Use the [T] and [S] keys to move the highlighting to “To normal input mode”
and then press the [ENTER] key.
z This enters the normal input mode and closes the input source selection screen.
Horizontal Flipping in the 3D Input Mode
In side-by-side 3D, a full frame consists of two halves on the left and right for each eye. In rare cases,
the left and right images may be reversed, which causes a loss of 3D depth. If this happens, try using
the following procedure to swap the left and right images with each other.
To swap the left and right images
In the 3D input mode, press the [ENTER] key.