
User Manual
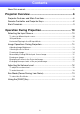
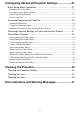
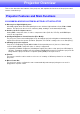

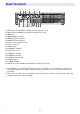
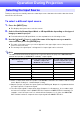
Table Of Contents
- Contents
- Projector Overview
- Operation During Projection
- Configuring Advanced Projector Settings
- Basic Setup Menu Operations
- Password Protecting the Projector
- Restoring Projector Settings to Their Initial Factory Defaults
- Setup Menu Contents
- Image Adjustment 1 Main Menu
- Image Adjustment 2 Main Menu
- Volume Adjustment Main Menu
- Screen Settings Main Menu
- Input Settings Main Menu
- Option Settings 1 Main Menu
- Option Settings 2 Main Menu
- Wired LAN Settings Main Menu (USB Port Models Only)
- USB Settings Main Menu (USB Port Models Only)
- Operational Info Main Menu
- Restore All Defaults Main Menu
- Cleaning the Projector
- Error Indicators and Warning Messages
- Appendix
- Connecting to a Video Device
- Connecting the HDMI Output of a Video Device or Computer to the Projector
- Remote Controller Signal Range
- Hanging the Projector from a Ceiling
- Projection Distance and Screen Size
- Aspect Ratio Setting and Projection Image
- Supported Signals
- Using Wired LAN to Control the Projector (XJ-H1650, XJ-H1750, XJ-ST145, XJ-ST155)
- Projector RS-232C Control
- Specifications

10
Operation During Projection
Turning on the projector initially causes the same input source that was selected the last time it was
turned off to be selected.
To select a different input source
1.
Press the [INPUT] key.
z This displays the input source selection screen.
2.
Select either the Normal Input Mode or 3D Input Mode depending on the type of
image you want to project.
z For details about the 3D Input Mode, see the explanation in the following section.
3.
Use the [T] and [S] keys to select the name of the input source you want to
select and then press the [ENTER] key.
z The name of the input source you select appears in the upper right corner of the projection
screen for a few seconds.
z The message “No signal input.” will appear if no input signal can be selected.
Note
The table below shows how the input source selection affects the projector’s MONITOR OUT
terminal and speaker (or AUDIO OUT terminal)*
1
output signals.
Selecting the Input Source
When this input source is
selected:
The video input signal from this
terminal is output to the
MONITOR OUT terminal:
The audio input signal from this
terminal is output to the speaker
(or AUDIO OUT terminal):
Computer 1 COMPUTER IN 1*
2
AUDIO IN 1
Computer 2 COMPUTER IN 2*
2
AUDIO IN 2
S-video
*2 *3
AUDIO IN L/R
Video
*2 *3
AUDIO IN L/R
HDMI
*2 *3
HDMI
USB
*2 *3
USB
*1 Audio is output from either the speaker or AUDIO OUT terminal in accordance with the setup
menu “Option Settings 2
J
Audio Output” setting.
*2 Output is proper only when the input signal is an RGB signal. Output is not guaranteed when
the input signal is a component signal.
*3 The video input signal is output from either Computer 1 or Computer 2, in accordance with
the last selected input source (COMPUTER IN 1 terminal or COMPUTER IN 2 terminal). For
example, even if the input source is switched from Computer 1 to S-video, the MONITOR
OUT terminal continues output the video input signal from COMPUTER IN 1.