
User's Manual


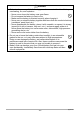
Table Of Contents
- Accessories
- Read this first!
- Contents
- General Guide
- Monitor Screen Contents and How to Change Them
- Quick Start Basics
- What you can do with your CASIO camera
- Using the Attachment
- Using the Touch Panel
- First, charge the battery prior to use.
- Turning Power On and Off
- Configuring Basic Settings the First Time You Turn On the Camera
- Preparing a Memory Card
- Shooting a Snapshot
- Viewing Snapshots
- Deleting Snapshots and Movies
- Snapshot Shooting Precautions
- Recording Images
- Advanced Recording Settings
- Using the REC Menu
- Shooting by Touching the Monitor Screen (Touch Shooting)
- Movie Image Quality Settings (Movie Quality)
- Reducing Blur Due to Camera Movement During Movie Recording (Movie Anti Shake)
- Shooting a Burst of Images (High Speed CS)
- Correcting Image Brightness (Brightness)
- Adjusting White Balance (White Balance)
- Specifying ISO Sensitivity (ISO)
- Self-shooting (Mirror Image)
- Reducing Wind Noise during Movie Recording (Wind Noise Cut)
- Turning on Image Review (Review)
- Saving an Additional Full View Version of an Image (Double Save)
- Using the REC Menu
- Viewing Snapshots and Movies
- Other Playback Functions (PLAY)
- Connecting the Camera with a Smartphone (Wireless Connection)
- Controlling Your Camera with a Smartphone
- Using a Wireless Mode
- Getting Ready to Establish a Connection between a Smartphone and Your Camera
- Using a Smartphone as a Camera Remote Controller (Shoot with phone)
- Sending a Snapshot or Movie File from Camera Memory to a Smartphone (Send Selected Image)
- Viewing Snapshots and Movies in Camera Memory on a Smartphone (View on phone)
- Configuring Wireless Connection Settings
- Having Images Shot with the Camera Sent to a Smartphone Automatically (Auto Send)
- Specifying Images to be Sent by Auto Send (Auto Send File Settings)
- Resizing Snapshots before Sending Them to a Smartphone (Resize When Sending)
- Changing the Camera Password for Wireless LAN Connection (WLAN password)
- Unpairing the Camera from a Smartphone (Unpairing)
- Using Two Cameras at the Same Time (Multi Camera Mode)
- Printing
- Using the Camera with a Computer
- Other Settings (Set Up)
- Adjusting Monitor Screen Brightness (Screen)
- Selecting Display Information (Info)
- Locking the Camera or Controller Screen Orientation (Rotation Lock)
- Configuring Camera Sound Settings (Camera Sound)
- Using the Vibration Function (Vibration)
- Setting the Camera’s Clock (Adjust)
- Specifying the Date Style (Date Style)
- Specifying the Display Language (Language)
- Specifying the Controller Sleep State Trigger Time (Sleep)
- Formatting Built-in Memory or a Memory Card (Format)
- Resetting the Camera to Factory Defaults (Reset)
- Checking the Current Camera Firmware Version (Version)
- Registering a Second Camera (Multi Camera Mode)
- Appendix

102
Using the Camera with a Computer
The camera stores images you shoot in accordance with the Design Rule for Camera
File System (DCF).
. About DCF
The following operations are supported for DCF-compliant images. Note, however,
that CASIO makes no performance guarantees concerning these operations.
• Transferring this camera’s DCF-compliant images to another manufacturer’s
camera and view them.
• Printing this camera’s DCF-compliant images on another manufacturer’s printer.
• Transferring another camera’s DCF-compliant images to this camera and view
them.
. Memory Folder Structure
DCIM Folder
Recording Folder
Image File
Movie File
Recording Folder
Recording Folder
* Used when creating a Highlight Photo or Highlight Movie.
. Supported Image Files
• Image files shot with this camera
• DCF-compliant image files
This camera may not be able to display an image, even if it is DCF-compliant. When
displaying an image recorded on another camera, it may take a long time for the
image to appear on this camera’s monitor screen.
. Built-in Memory and Memory Card Data Handling Precautions
• Whenever copying memory contents to your computer, you should copy the DCIM
folder and all of its contents. A good way to keep track of multiple DCIM folders is
to change their names to dates or something similar after you copy them to your
computer. If you later decided to return a DCIM folder to the camera, however, be
sure to change its name back to DCIM. The camera is designed to recognize only a
root file with the name DCIM. Note the camera also will not be able to recognize the
folders inside the DCIM folder unless they have the names they originally had
when you copied them from the camera to your computer.
• Folders and files must be stored in accordance with the “Memory Folder Structure”
shown on page 102 in order for the camera to be able to recognize them correctly.
Memory Card Data
DCIM
100CASIO
CIMG0001.JPG
CIMG0002.MOV
101CASIO
102CASIO