
User's Guide


30
Photography
Photography
This camera features 7 recording modes that can be selected according to the
purpose of the photography.
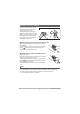
1. Press [p] (Power) to switch the camera on in recording mode.
• If the camera is in playback mode, press [p] (Playback) or the shutter button
to switch to recording mode.
2. Press [MODE] and select the recording mode.
The mode changes in the sequence shown below each time you press [MODE].
NORMALĺ DERMO CONTĺ DERMOĺ DERMO AIFĺ
MOVIE NORMALĺ MOVIE DERMOĺ MICROSCOPE
Setting Recording Modes and Shooting Still Images and
Videos
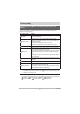
Recording mode Details
NORMAL
Use this mode to take a normal photograph of the affected
area and its periphery.
DERMO CONT
Use this mode to use a single shutter release to take
polarized, non-polarized and UV* close-up shots with the
same angle of view.
* A safe light wavelength of 405 nm is used.
When UV is enabled, the shot is taken with UV light.
DERMO Use this mode to take a close-up shot of the affected area.
DERMO AIF
Use this mode to take a close-up shot of a raised affected
area so that the entire area is in focus.
A single shutter release takes multiple images with a shifting
focal point and the images are then merged into a single
shot.
Photography in this mode requires the optional 3D adapter
(sold separately).
NORMAL
Use this mode to shoot a video of the affected area and its
periphery.
DERMO Use this mode to take a close-up video of the affected area.
MICROSCOPE
Use this mode to photograph subjects such as pathological
tissue viewed through a microscope.
Photography in this mode requires the optional microscope
adapter (DMS-100M (sold separately)).
B