
User's Manual Part 3

Release8InstallationandConfigurationGuide
Issue2,November2007 Draft5forRegula toryReview 347
WARNING!
Although the output of the power converter is 24 V, the 100-W power rating
classifies the converter as a Class 2 electric device. For this reason, whenever
you work on power in the CMMmicro, you must
first disconnect the DC converter
from the AC power source.
Perform the following procedure to install the provided power supply.
Procedure 25: Installing the Power Supply for the CMMmicro
1. Connect the 6-ft (2-m) AC power cord to the power converter (but not yet to an
AC receptacle).
2. Select the length of power cord as follows:
a. If either mounting the unit inside with the power converter or outside within 9
ft (2.8 m) of the power converter, select the 10-ft (3-m) DC power cord (rated
for outdoor use).
b. If mounting the unit outside and further than 9 ft (2.8 m) from the power
converter, ensure that this additional length of cord is either UV-resistant or
shielded from UV rays.
• use a terminal block, connector, or splice to add the additional length.
• protect the terminal block, connector, or splice (as inside a weatherized
enclosure, for example).
Table 50: Wire size for CMMmicro power runs of longer than 9 feet (2.8 m)
DC Power Cord Length Proper Wire Size
9−90 ft (3−25 m) 12 AWG (4 mm
2
)
91−145 ft (26−45 m) 10 AWG (6 mm
2
)
146−230 ft (46−70 m) 8 AWG (10 mm
2
)
>230 ft (>70 m) 6 AWG (16 mm
2
)
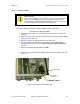
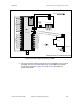
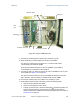
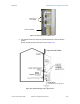
3. Refer to Figure 70: CMMmicro connections on Page 221.
4. Feed the power cord through the bulkhead connector of the CMMmicro.
5. Connect the converter lead whose insulation has a white stripe to +V on the
CMMmicro terminal block.
6. Connect the converter lead whose insulation is solid black to −V on the
CMMmicro terminal block.
end of procedure