
User's Manual Part 3


Release8InstallationandConfigurationGuide
Issue2,November2007 Draft5forRegula toryReview 340
19.5.2 RecommendedToolsforMountingaCMM2
The following tools may be needed for mounting the CMM2:
• 3/8” nut driver
• 12” adjustable wrench
• 14-mm wrench for pole-mounting
• needle-nose pliers
19.5.3 MountingaCMM2
Perform the following procedure to mount the CMM2.
Procedure 21: Mounting the CMM2
1. Ensure that the mounting position
• is not further than 328 feet (100 meters) of cable from the furthest AP or BH
that the CMM2 will serve.
• is not closer than 10 feet (3 meters) to the nearest AP or BH.
• is not further than 100 feet (30.4 meters) of cable from the intended mounting
position of the GPS antenna.
• allows you to fully open the door of the CMM2 for service.
2. Select a support structure to which the flanges of the CMM2 can be mounted.
3. If the support structure is a wall, use screws or bolts (neither is provided) to
attach the flanges to the wall.
4. If the support structure is an irregular-shaped object, use adjustable stainless
steel bands (provided) to attach the CMM2 to the object.
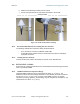
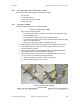
5. If the support structure is a pole that has an outside diameter of 3 to 8 cm, or
1.25 to 3 inches, use a toothed V-bracket (provided) to
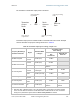
a. attach the V-bracket to the pole as shown in Figure 122.
b. attach the CMM2 flanges to the V-bracket.
Figure 122: Detail of pole mounting
end of procedure