
User's Manual Part 3


Release8InstallationandConfigurationGuide
Issue2,November2007 Draft5forRegula toryReview 338
IMPORTANT!
Connectorized antennas require professional installation.
The professional installer is responsible for
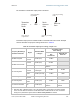
• selection of an antenna that the regulatory agency has approved for use with the
Cyclone 900-MHz AP and SM.
• setting of the gain consistent with regulatory limitations and antenna
specifications.
• ensuring that the polarity—horizontal or vertical—is identical on both ends of the
link. (This may be less obvious where an integrated antenna is used on one end
and a connectorized on the other.)
• use of moisture sealing tape or wrap to provide long-term integrity for the
connection.
19.4 INSTALLINGAGPSANTENNA
The following information describes the recommended tools and procedures to mount the
GPS antenna.
Recommended Tools for GPS Antenna Mounting
The following tools may be needed for mounting the GPS antenna:
• 3/8” nut driver
• 12” adjustable wrench
• 7/16” wrench
• Needle-nose pliers
Mounting a GPS Antenna
Perform the following procedure to mount a GPS antenna.
Procedure 20: Mounting the GPS antenna
1. Ensure that the mounting position
• has an unobstructed view of the sky to 20º above the horizon.
• is not the highest object at the site. (This is important for lightning protection.)
• is not further than 100 feet (30.4 meters) of cable from the CMM2 or
CMMmicro.
2. Select a pole that has an outside diameter of 1.25 to 1.5 inches (3 to 4 cm) to
which the GPS antenna bracket can be mounted.
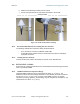
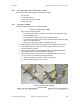
3. Place the U-bolts (provided) around the pole as shown in Figure 121.
4. Slide the GPS antenna bracket onto the U-bolts.
5. Slide the ring washers (provided) onto the U-bolts.