
User's Manual Part 2


Release8InstallationandConfigurationGuide
Issue2,November2007 Draft5forRegulatoryReview 192
obtain time and date before the first (or next) 15-minute interval query of the NTP server,
click Get Time through NTP.
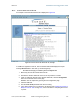
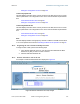
If you enter a time and date, the format for entry is
Time :
hh
/
mm
/
ss
Date :
MM
/
dd
/
yyyy
where
hh
represents the two-digit hour in the range 00 to 24
mm
represents the two-digit minute
ss
represents the two-digit second
MM
represents the two-digit month
dd
represents the two-digit day
yyyy
represents the four-digit year
Proceed with the test setup as follows.
◦ Enter the appropriate information in the format shown above.
◦ Then click the Set Time and Date button.
NOTE:The time displayed at the top of this page is static unless your browser is
set to automatically refresh.
Procedure 8: Setting up the SM for test
1. In one hand, securely hold the top (larger shell) of the SM. With the other hand,
depress the lever in the back of the base cover (smaller shell). Remove the base
cover.
2. Plug one end of a CAT 5 Ethernet cable into the SM RJ-45 jack.
3. Plug the other end of the Ethernet cable into the jack in the pig tail that hangs
from the power supply.
4. Roughly aim the SM toward the AP.
WARNING!
From this point until you remove power from the SM, stay at least as far from the
SM as the minimum separation distance specified in
Table 37 on Page 169.
5. Plug the power supply into an electrical outlet.
6. Repeat the foregoing steps for each SM that you wish to include in the test.
7. Back at the computing device, on the left side of the Time & Date tab, click
Home.
8. Click the Session Status tab.
end of procedure