
User manual


Switch position „above“ and push button down:
- Light 2 on / off (Work lights, front / inside) / Right cross stick – normal functions
Switch position „center“ and push button down:
- Reversing beeper on / off (Beeper is activated automatically after the battery change
again) / Right cross stick – normal functions
Switch position „center“ and push button up:
- Not used
Switch position „down“ and push botton up:
- Light 3 on / off (Work lights, rear) / Right cross stick lowered mast up or down is
disabled – rear ripper up or down is enabled
Setting the straight-line / track trimmer:
o Attention! : A potentiometer ("poti") is a very sensitive electronic components that
can be destroyed by carelessness and violence! (not covered by the Warranty)
o Potentiometer in the middle position: Both drive motors / tracks run at 100%
o Potentiometer in the max. left position: The left drive motor is running at 90%, and
the right with 100%
o Potentiometer in the max. right position: The right drive motor is running with 90%,
and the left with 100%
o However, if the left or right track "runs" faster, turn the poti in each direction for
example: The left track runs faster, please use a fitting screwdriver to adjust, turn
carefully! to the left, and this track is getting slower. The max. to slow each track is
10%. After adjustment, take your model and drive a straight line from 2 - 3 m if the
result is different, if it´s necessary to readjust again.
Voltage monitoring for 7.4V (2S) Li-Po battery:
The voltage of the drive battery is checked at every connecting to the electronics unit,
(Duration of the test about approx. 2 sec). If the voltage of the drive battery at the opera-
ting is lower then5,8 volts (2,9 Volt each Cell), so an optical (all 6 Working lights are
flashing) and an acoustical signal warning (beep tone) will be activated (Battery low
voltage protection). Stop operation immediately so that the 7.4 volts (2S) Li-Po battery is
getting not damaged. Where the duration of the optical and acoustic warning more than 2
seconds, charge the drive battery or replace it with a charged one.
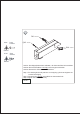
Installation of the electronics unit into the model
Mount the electronics unit on the provided "radio deck" and fix it with two strips of double
sided tape (not included).