Terminal Server Router QUICK START GUIDE Part Number: 002-0152-0005 Product Release: 1.
Copyright 2004 Carrier Access Corporation. All rights reserved. The information presented in this manual is subject to change without notice and does not represent a commitment on the part of Carrier Access Corporation. The hardware and software described herein are furnished under a license or non-disclosure agreement. The hardware, software, and manual may be used or copied only in accordance with the terms of this agreement.
QUICK START GUIDE In this Guide n Installation n Basic Setup n PPP Internet Connection and Public IP Address Routing n Frame Relay Internet Connection and Public IP Address Routing n Internet Connection using PPP, NAT/PAT and Firewall Filters n Internet Connection using NAT and Static NAT Addresses n Back-to-Back with PPP n Back-to-Back with Multi-Link PPP n Back-to-Back with Frame Relay
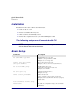
Quick Start Guide Installation Installation Installation of the router card into the Adit chassis. l Unit can be on or off l Router card will work in any slot l Slide card into slot until fully seated l Router has completed it’s boot cycle when CRD light is solid The following setups are all executed with CLI NOTE: Configuration can be done with the following CLI commands or with the Router Menu-Driven Software.
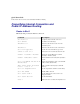
Quick Start Guide PPP Internet Connection and Public IP Address Routing PPP Internet Connection and Public IP Address Routing Router in Slot 1 ISP Router that provides the Internet connection.
Quick Start Guide Frame Relay Internet Connection and Public IP Address Routing Frame Relay Internet Connection and Public IP Address Routing Router in Slot 1 ISP Router that provides the Internet connection.
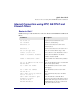
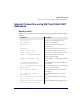
Quick Start Guide Internet Connection using PPP, NAT/PAT and Firewall Filters Internet Connection using PPP, NAT/PAT and Firewall Filters Router in Slot 1 ISP Router that provides the Internet connection. Router with NAT/PAT and Firewall Filters.
Quick Start Guide Internet Connection using PPP, NAT/PAT and Firewall Filters 8 Command Description add 1 "wan1" firewall 2 pass inout nolog ping 192.168.21.14/32 xxx.xxx.xxx.xxx/32 Adds a Firewall rule to the WAN. Where xxx.xxx.xxx.xxx is the host’s IP address at the far end that will be able to ping or telnet to the router. 0.0.0.0/0 will allow any other host at the far end to ping and/or telnet to the router. add 1 "wan1" firewall 3 pass inout nolog ping 0.0.0.0/0 0.0.0.
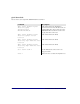
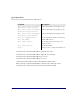
Quick Start Guide Internet Connection using NAT and Static NAT Addresses Internet Connection using NAT and Static NAT Addresses Router in Slot 1 ISP Router that provides the Internet connection. Router with NAT and Static NAT addresses.
Quick Start Guide Internet Connection using NAT and Static NAT Addresses Command Description add 1 "wan1" static nat address 192.168.21.15 216.174.44.233 Add static NAT bi-directional mapping to wan1 add 1 "wan1" static nat address 192.168.21.16 216.174.44.234 Add static NAT bi-directional mapping to wan1 add 1 "wan1" static nat address 192.168.21.17 216.174.44.
Quick Start Guide Back-to-Back with PPP Back-to-Back with PPP The following configuration will set up two Routers back-to-back with PPP.
Quick Start Guide Back-to-Back with PPP Denver Router in Slot 1 12 Command Description set 1 default Set Router to default settings disconnect a:1 Disconnect all connections to the T1 on the Controller (slot a) disconnect 1 Disconnect all connections to the router in slot 1 set clock1 a:1 Set primary master transmit clock source set a:1:all type data Set the T1-1 of the Controller, Type to Data connect a:1:all 1:1:1 Connect all of T1-1 to the Router that is in slot 1 rename 1 "LocalUnit" "D
Quick Start Guide Back-to-Back with Multi-Link PPP Back-to-Back with Multi-Link PPP The following configuration will set up two Adit 600 Routers back-to-back with MultiLink PPP.
Quick Start Guide Back-to-Back with Multi-Link PPP Denver Router in Slot 1 14 Command Description set 1 default Set Router to default settings disconnect a:1 Disconnect all connections to the T1 on the Controller (slot a) disconnect 1 Disconnect all connections to the router in slot 1 set clock1 a:1 Set primary master transmit clock source set a:1:all type data Set the T1-1 of the Controller, Type to Data connect a:1:all 1:1:1 Connect all of T1-1 to the Router that is in slot 1 connect a:2:
Quick Start Guide Back-to-Back with Frame Relay Back-to-Back with Frame Relay The following configuration will set up two Routers back-to-back with Frame Relay.
Quick Start Guide Back-to-Back with Frame Relay Denver Router in Slot 3 16 Command Description set 3 default Set Router to default settings disconnect a:1 Disconnect all connections to the T1 on the Controller (slot a) disconnect 3 Disconnect all connections to the router in slot 1 set clock1 a:1 Set primary master transmit clock source set a:1:all type data Set the T1-1 of the Controller, Type to Data connect a:1:all 3:1:1 Connect all of T1-1 to the Router that is in slot 1 rename 3 "Local