
User manual


Adit 3500 - Release 1.6 2-5
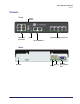
Physical Installation
Adit 3500 Installation
Compliant Installation
NOTE: It is important the DS1/E1 Network Interface Cables are secured separately from the
power and Signal Cables (note E1 is a future feature).
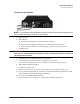
1. Inspect the unit.
2. Mount the unit.
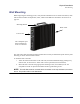
Wall mounting installation, see Wall Mounting on page 2-7
Wall mounting with Battery Backup Unit, see Battery Backup on page 2-10
Rack mounting installation, see Rack Mounting (Optional Feature) on page 2-8
3. Ground the unit.
WARNING! THE ADIT 3500 IS REQUIRED TO BE PERMANENTLY GROUNDED FOR THE
PROTECTION OF USERS AND SERVICE PERSONNEL. REFER TO GROUNDING THE UNIT ON PAGE 3-3
FOR DETAILED INSTRUCTIONS.
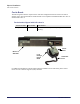
4. Connect DS1 (T1), and Ethernet connections as needed.
5. Connect RS-232 connector and connect via HyperTerm on your PC.
Note: With this running before power is enabled, you can monitor the boot process.
6. Attach PBX and phone line cables.
7. Connect Power to the unit.
8. Monitor the boot process on your PC, when complete the status light should be green.
9. For any software enabled features, enter the key command. See the key command in the Adit
3000 CLI Reference Manual, for detailed information.
10. To verify use the show version command.
11. To provision the unit. See Chapter 4, Configuration for detailed instructions.