
User's Manual


Trailblazer Installation and User Manual version 1.03
9
2.3 Bench Testing Instructions
Before going into the field set up the units on your bench to become familiar with their
set up, operation, configuration, and verify their functionality. Each system is shipped
with a handy, full-color “Quick Start Guide” for simplified step-by-step instructions for
bench testing. The following section will provide you with the same information in
greater detail.
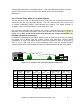
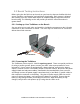
2.3.1 Setting up Your Trailblazer on the Bench
Set your units next to each other and attach the included test antennas to the N female
connectors on the enclosures as shown. The units may not achieve an RF connection
without these little antennas.
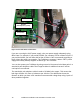
2.3.2 Powering the Trailblazer
The Trailblazer units accept 12 -24VDC negative ground. There are special provisions
for using a positive ground, please contact your CWT sales representative for more
information. If your system is equipped with a battery backup, verify that the battery
output is 12VDC or more. If the battery output is less than 12VDC, disconnect the power
supply’s black and red power cables, connected to the terminal block, from your unit,
and simply connect the power supply’s terminated red (+) and black (-) power cables to
their respective terminals on the battery. Plug the AC power supply cable into an AC
source to charge the battery, and verify that the battery is charging. Ensure that the
battery is fully charged before proceeding into the field. When the battery is fully
charged, verify that the unit powers up by noting that the LEDs are lit.
Test Antennas