
User guide


Carlin part number MNEZ123 Rev. 07/13/11
– 9 –
Model EZ-1/2/3 oil burners — Instruction manual
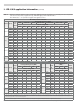
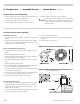
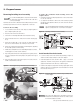
Attach air tube to housing
1. The burner chassis is supplied with two screws mounted into the hous-
ing.
2. Loosen these screws about three turns.
3. Slidetheairtubeontothehousing,aligningtheJ-notchesinthetube
withthehousingscrews(Figure3).
4. TurnthetubetoengagetheJ-notches.
5. InsertthetwomountingscrewsintotheTOPTWOairtubeholes.
6. Tighten the screws.
Figure 3 Attaching air tube to burner chassis
2. Prepare site • assemble burner • mount burner (continued)
Mount burner in appliance
Welded flange-mounted burner
1. Place gasket over burner air tube and insert burner into appliance
opening.Secureinplacewithhardwaresuppliedwithappliance.
Universalangeorpedestalmount—theseinsertionmethods
are intended only for negative overfire pressure. For pressur-
izedring,youmustobtainaburnerwithaweldedange,
designed for use with the specific appliance. Failure to comply
could result in severe personal injury, death or substantial
property damage.
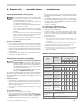
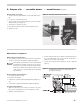
Figure 4 Seal opening around burner air tube when pedestal
mounting (burner shown with tube attached to
housing and installed)
3. Insert the burner/air tube into the appliance opening until pen/pencil
lineisevenwithappliancefront(soendofairtubeisushwith,or
slightlyshortof,theinsideofthechamber).
4. Sealthespacearoundtheairtubewithfurnacecementorequivalent
(Figure4).
Universal flange-mounted burner
1. Place gasket over burner air tube.
2. Insert burner into appliance.
3. Verifyburnerisseatedlevelandstraight.Adjustangeslightlyifneces-
sary.
4. Secureangetoappliancewithhardwaresuppliedwithappliance.
Pedestal mounted burner
1. Adjustthepedestallegssotheairtubeislevelandthecenterofthe
tube is at the same height as the center of the appliance opening.
2. Tighten the pedestal leg jam nuts.