
User guide


Carlin part number MNEZ123 Rev. 07/13/11
– 8 –
Model EZ-1/2/3 oil burners — Instruction manual
2. Prepare site • assemble burner • mount burner (continued)
Inspect burner and components
• Checktheairtubelength.VerifytheusablelengthofthetubeUTLwill
belongenough(see“Mountburnerinappliance”).
• Visuallyinspectallburnercomponentsandwiring.
• Verifythatwiringisintactandleadsaresecurelyconnected.
Assemble burner (when required)
Welded-flange burners
1. Verifytheboltpatternontheappliancechambermatchestheange
pattern.
2. Verifytheinsertiondepth(UTL)matchesthedepthoftheappliance
opening(sotheendoftheairtubeisushwith,orslightlyshortof,the
insidesurfaceofthecombustionchamber).
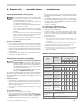
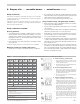
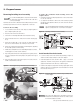
Figure 1 Universal flange mounting dimensions
Pedestal-mounted burners
1. Check the diameter of the appliance opening. If larger than 4½ inches,
rebuild the opening so the open is reduced to 4½ inches maximum.
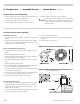
2. InserttheairtubeintotheapplianceopeningasinFigure2.Donot
attach air tube to housing yet.
3. Slidethetubeinuntiltheendofthetubeisushwith,orupto¼inch
short of, the inside of the combustion chamber.
Universal (adjustable) flange burners
1. Verifytheangemountingslotslineupwiththeappliancebolts.See
Figure 1.
2. Sliptheadjustableangeontotheairtube.
3. Measure the distance from the inside of the combustion chamber to
the outside of the appliance mounting plate.
4. Positiontheuniversalangeatthisdistancefromtheendoftheair
tube.
5. Tightenthelockingscrewsngertight.
6. Inserttheairtube/angeassemblyintotheapplianceopeningandlevel
theairtubewithaspiritlevel.Adjustangeifneeded.
7. Theendoftheairtubeshouldbeush,oralmostush,withtheinside
of the combustion chamber wall.
8. Verifytheairtubeislevelandinsertedthecorrecteddepth.Adjustif
necessary.Thentightentheangelockingscrewssecurely.
9. Removetheange/airtubeassemblyfromtheopening.
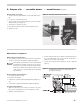
Figure 2 Mark insertion depth on air tube when using
universal flange mounting
4. Level the air tube using a spirit level.
5. Marktheairtubepositionwithapenorpencilaroundthecircumference
of the tube.
6. Removeairtubefromtheopening.
• Verifythatallburnercomponentsareingoodcondition.
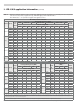
Donotinstalloroperatetheburnerifanycomponentisdam-
aged or if burner does not comply with the specifications of
Table 1, page 3, and other guidelines of this manual and the
appliance manual.