™ Instruction manual Check burner cartons carefully. The Model 702GAS gas burner was assembled and tested at the factory before shipment. If the burner was ordered with a completed assembled gas train, the train was pressure tested and electrically checked for proper operation. Where possible, the gas train or components were shipped in the same carton as the burner. Check your packing slip for the number of cartons shipped from the factory.
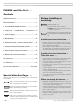
Model 702GAS Advanced gas burners — Instruction manual Where appliance instructions differ from this manual, follow the appliance instructions. PLEASE read this first . . . Contents PLEASE read this first..............................................................2 General information.................................................................3 Before installing or servicing: Should overheating occur: (1) Shut off the gas supply to the burner.
Model 702GAS Advanced gas burners — Instruction manual Where appliance instructions differ from this manual, follow the appliance instructions. General information Burner applications Follow all instructions in this manual, the primary control data sheet and the appliance manual. Verify the burner is correct for the appliance being used and for all applicable codes/standards. Adjust the firing rate if necessary due to positive overfire pressure and/or altitudes more than 2,000 feet above sea level.
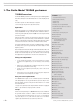
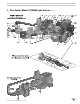
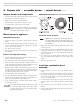
Model 702GAS Advanced gas burners — Instruction manual Where appliance instructions differ from this manual, follow the appliance instructions. 1. The Carlin Model 702GAS gas burner 702GAS overview The Model 702GAS gas burner is a low-high-low (step modulating) burner that utilizes a damper motor and butterfly valve to control air (and gas fuel rate). The burner operates on either natural gas or propane. See the next page for gas train component locations.
Model 702GAS Advanced gas burners — Instruction manual Where appliance instructions differ from this manual, follow the appliance instructions. 1. The Carlin Model 702GAS gas burner Carlin part number MN702G Rev.
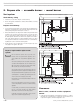
Model 702GAS Advanced gas burners — Instruction manual Where appliance instructions differ from this manual, follow the appliance instructions. 2. Prepare site • assemble burner • mount burner Vent system Figure 1 Vent and vent connector installations, typical Vent/chimney sizing 1. Follow all local codes when sizing the vent and chimney. 2. Refer to the appliance manufacturer’s manual, when available, for venting recommendations. Prepare vent/chimney 1.
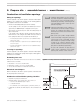
Model 702GAS Advanced gas burners — Instruction manual Where appliance instructions differ from this manual, follow the appliance instructions. 2. Prepare site • assemble burner • mount burner (continued) Combustion air/ventilation openings Installing the burner/appliance in a space that does not provide enough air for combustion and ventilation can result in severe personal injury, death or substantial property damage.
Model 702GAS Advanced gas burners — Instruction manual Where appliance instructions differ from this manual, follow the appliance instructions. 2. Prepare site • assemble burner • mount burner (continued) Prepare the appliance Burner input: Install a burner sized for the normal input rating of the appliance. Do not install a burner with a higher firing rate than the appliance rating. Do not install a burner with a firing rate more than 10% lower than the appliance rating.
Model 702GAS Advanced gas burners — Instruction manual Where appliance instructions differ from this manual, follow the appliance instructions. 2.
Model 702GAS Advanced gas burners — Instruction manual Where appliance instructions differ from this manual, follow the appliance instructions. 2. Prepare site • assemble burner • mount burner Inspect burner and components • Check the air tube length. Verify the usable length of the tube UTL will be long enough (see “Mount burner in appliance”). • Visually inspect all burner components and wiring. • Verify that wiring is intact and leads are securely connected.
Model 702GAS Advanced gas burners — Instruction manual Where appliance instructions differ from this manual, follow the appliance instructions. 2. Prepare site • assemble burner • mount burner Figure 5 Electrode settings (continued) Install gas train on burner 1. The standard burner gas train is shipped fully assembled, with the piping disconnected at the gas train unions. See separate instructions if installing an optional knocked down gas train.
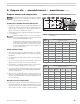
Model 702GAS Advanced gas burners — Instruction manual Where appliance instructions differ from this manual, follow the appliance instructions. 3. Install gas piping Connect from the gas supply to the burner gas train inlet using new, clean black iron pipe and malleable iron fittings only. Do not use copper, brass, cast iron or galvanized pipe or fittings. Provide support for gas piping. Do not rest the weight of the gas piping on burner gas train. Provide a support for the burner gas train.
Model 702GAS Advanced gas burners — Instruction manual Where appliance instructions differ from this manual, follow the appliance instructions. 3. Install gas piping (continued) Capacities of black iron pipe, cubic feet gas/hour Table 3 Figure 8 Gas train pressure drop NATURAL GAS Capacities in Cubic feet per hour for Schedule 40 metal pipe Pipe size (inches) Total length of gas piping, from meter to burner connection (feet) 20 40 60 80 100 Natural gas @ .60 specific gravity, pressure drop 0.
Model 702GAS Advanced gas burners — Instruction manual Where appliance instructions differ from this manual, follow the appliance instructions. 4. Wire the burner — RM7897C primary control Wire the burner (RM7897C primary control only) 1. All wiring must comply with: In the U.S. — the National Electrical Code, ANSI Z223.1/NFPA 54. • In Canada — the Canadian Electrical Code Part 1, CSA standard C22.1. • All applicable local codes/standards.
Model 702GAS Advanced gas burners — Instruction manual Where appliance instructions differ from this manual, follow the appliance instructions. 4. Wire the burner — RM7897C primary control Figure 14 702GAS field wiring connections (RM7897C only) (continued) Low-High-Low step modulation 1. To take advantage of the energy-saving potential of the Model 702GAS gas burner, it should be wired to operate at low-high-low cycles.
Model 702GAS Advanced gas burners — Instruction manual Where appliance instructions differ from this manual, follow the appliance instructions. 5. Checkout procedure — before starting the burner Before firing the burner . . . Should overheating or an emergency occur, im- Checklist before firing . . . ❏❏ mediately do the following: Burner and appliance installed per this manual and appliance instruction manual? • Shut off gas supply valve.
Model 702GAS Advanced gas burners — Instruction manual Where appliance instructions differ from this manual, follow the appliance instructions. 6. Set burner initial head and damper positions Figure 16 Set initial combustion head position Follow the procedures given here and on the following pages to ensure the burner is correctly adjusted. Take your time and the adjustments given in the following should result in good operation, and avoid return service calls.
Model 702GAS Advanced gas burners — Instruction manual Where appliance instructions differ from this manual, follow the appliance instructions. 7. Adjust the burner using test instruments Step 1 The settings given in this section are initial settings only. You must use test instruments to check combustion, and adjust the burner as necessary, following the procedures given in the following pages of this manual.
Model 702GAS Advanced gas burners — Instruction manual Where appliance instructions differ from this manual, follow the appliance instructions. 7. Adjust the burner using test instruments Step 3 (continued) Figure 18 Butterfly gas valve linkage Set main gas pressure regulator 1. With the gas pilot operating correctly, and the UV sensor flame signal above minimum required, the primary control will cycle the burner to main gas. 2.
Model 702GAS Advanced gas burners — Instruction manual Where appliance instructions differ from this manual, follow the appliance instructions. 7. Adjust the burner using test instruments (continued) Step 4 Smell around the gas train and check all joints with a soap suds mixture to ensure the gas train and all components are tight and leak-free. Shut down the burner and correct any leak immediately. Failure to comply could result in severe personal injury, death or substantial property damage.
Model 702GAS Advanced gas burners — Instruction manual Where appliance instructions differ from this manual, follow the appliance instructions. 7. Adjust the burner using test instruments (continued) Step 5 Verify operation Burner/appliance/controls operation ❏❏ ❏❏ Test operating and limit controls on appliance as specified in appliance instructions. ❏❏ Start and stop the burner several times, allowing the primary control to sequence through normal operation.
Model 702GAS Advanced gas burners — Instruction manual Where appliance instructions differ from this manual, follow the appliance instructions. 8. Maintenance and service procedures Turn off power to appliance when servicing burner. After servicing, always operate burner/appliance to verify all components are functioning correctly and that the burner is properly adjusted. Failure to comply could result in severe personal injury, death or substantial property damage. 3.
Model 702GAS Advanced gas burners — Instruction manual Where appliance instructions differ from this manual, follow the appliance instructions. 8.
Model 702GAS Advanced gas burners — Instruction manual Where appliance instructions differ from this manual, follow the appliance instructions. For parts not shown or listed, contact factory and/or check separate documentation supplied with appliance/burner unit. 9. Repair parts — Burner housing and components Item Description Part No.
Model 702GAS Advanced gas burners — Instruction manual Where appliance instructions differ from this manual, follow the appliance instructions. For parts not shown or listed, contact factory and/or check separate documentation supplied with appliance/burner unit. 9. Repair parts (continued) Carlin part number MN702G Rev.
Model 702GAS Advanced gas burners — Instruction manual Where appliance instructions differ from this manual, follow the appliance instructions. For parts not shown or listed, contact factory and/or check separate documentation supplied with appliance/burner unit. 9. Repair parts — Burner housing and components Item 1 Description Orifice nipple assembly Part No.
Model 702GAS Advanced gas burners — Instruction manual Where appliance instructions differ from this manual, follow the appliance instructions. For parts not shown or listed, contact factory and/or check separate documentation supplied with appliance/burner unit. 9. Repair parts (continued) Carlin part number MN702G Rev.
Model 702GAS Advanced gas burners — Instruction manual Where appliance instructions differ from this manual, follow the appliance instructions. 10. Dimensions Figure 19 Dimensional data, angled gas train configuration – 28 – Carlin part number MN702G Rev.
Model 702GAS Advanced gas burners — Instruction manual Where appliance instructions differ from this manual, follow the appliance instructions. 10. Dimensions (continued) Figure 20 Dimensional data, straight gas train configuration Carlin part number MN702G Rev.
Model 702GAS Advanced gas burners — Instruction manual Where appliance instructions differ from this manual, follow the appliance instructions. NOTES – 30 – Carlin part number MN702G Rev.
Model 702GAS Advanced gas burners — Instruction manual Where appliance instructions differ from this manual, follow the appliance instructions. NOTES Carlin part number MN702G Rev.
Model 702GAS Advanced gas burners — Instruction manual Where appliance instructions differ from this manual, follow the appliance instructions. 702GAS burner User care and maintenance Refer only to the information on this page, intended for your use. The remainder of this manual is intended only for your service technician. Failure to comply could result in severe personal injury, death or substantial property damage. For other than routine maintenance, contact a qualified service company.