
Operating instructions
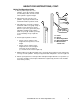


1930-M458-O1 Rev-E Waist-High 685X Series
10
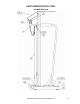
DIGITAL HEIGHT ROD INSTRUCTIONS
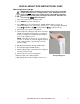
Digital Height Rod Installation
Before starting installation, please unpack carefully and remove all plastic wrappings, foam
fillers and cardboard material. You should have the following components:
Item Qty Description
1 1 Detecto Digital Height Rod (DHR)
2 4 #10x1/2” Hex Head Sheet Metal Screws (bracket to column)
3 2 Mounting Brackets
4 8 M4x0.7x5 Pan Head Machine Screws (bracket to height rod)
5 3 Cable Clip
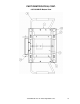
1. Align a mounting bracket with the holes in the height rod (near headpiece) and install
four (4) M4x0.7x4 Pan Head Machine screws to secure the bracket to the height rod.
2. Next, align the other mounting bracket with the lower holes in the height rod and install
four (4) M4x0.7x4 Pan Head Machine screws to secure the bracket to the height rod.
3. Align the mounting bracket (near the headpiece) with the holes in the back of the
column close to the display and install two (2) #10x1/2” Hex Head Sheet Metal screws
to secure the bracket to the column.
4. Align the holes in the other bracket with the lower holes in the column and install two (2)
#10x1/2” Hex Head Sheet Metal screws to secure the bracket to the column.
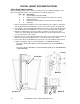
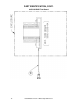
5. Connect the cable from the DHR to the port on the rear of the indicator that is labeled
height rod routing the cable as shown in Detail B. For additional information;
Refer to the MedVue MV1 Owner’s Manual (8555-M512-O1) for the 6854DHR or
6857DHR.
Refer to the MedVue MV2 Owner’s Manual (8555-0530-0M) for the 6854KGEUDHR
or 6857KGEUDHR
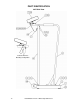
See Detail A
Column
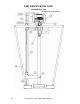
Detail A
1
4
2
3
See Detail B
Detail B
5