
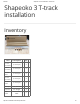
Data Sheet


5/3/2018 Shapeoko 3 T-track installation - Carbide 3D
http://docs.carbide3d.com/assembly/t-tracks/s3/ 5/5
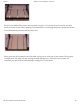
Each of the middle filler pieces are attached using x -/” screws. Start from one end and
work your way to the other, keeping close attention to not letting the piece ride up the screws.
Some downward pressure will help with this.
Work your way all the way across the table, trying not to strip any of the screws. Setting your
cordless drill to a lower torque setting can help prevent this. Once all of the screws are
installed, you are finished and can begin using your T-track table!