
Assembly Instructions


16/01/2019 Shapeoko Assembly Guide - Carbide 3D
https://docs.carbide3d.com/assembly/shapeoko/s3/ 7/35
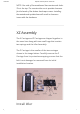
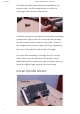
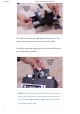
Align the spindle mount with the bottom set of
through holes on the z-carriage. The carbide logo
should go right side up, but the position of the
pocketed hole on the spindle mount does not matter
(left or right is ne).
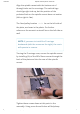
The xed pulley location should be on the left side of
the plate, as shown in the photo. For further
reference: the eccentric nuts will be on the left side as
well.
NOTE: If you were to install the Z-carriage
backwards (with the screws on the right), the z-axis
will operate in reverse.
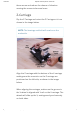
Turning the Z-carriage over, secure the spindle mount
by installing (2x) of the M5x16mm screws through the
back of the plate and into the rear of the spindle
mount.
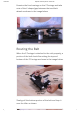
Tighten these screws down at this point in the
assembly. Using some thread locker will help keep