
Assembly Instructions


16/01/2019 Shapeoko Assembly Guide - Carbide 3D
https://docs.carbide3d.com/assembly/shapeoko/s3/ 34/35
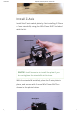
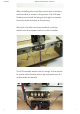
Squaring Gantry
1. Loosen all of the screws that hold the gantry
together (4 on each side), these should still be
loose from the initial assembly.
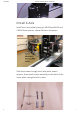
2. Loosen the screws that hold the Y axis rails in place
(16 total). These should also still be loose from the
initial assembly.
3. Slide the gantry to the front, so both Y plates are
touching the front plate.
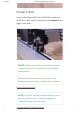
4. While holding the gantry against the front of the
machine tighten the front of the Y rails (8 total)
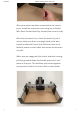
5. Now — systematically begin tightening the 8 bolts
on the gantry. Work your way from left to right,
going back and forth in an X pattern (similar to
tightening the lug nuts for the wheel of a car).
6. After the gantry has been secured, slide the gantry
to the rear of the machine and tighten the 8 screws
while keeping the gantry pressed against the rear
plate
Finishing
Your machine should now be completed! What now?
PROTIP: Remember to enable homing in the
software conguration to congure your software.
Enable Homing Article