Impressa Z5 Fully Automatic Coffee & Espresso Center with Clearyl Water Care System Customer Service 1-800-220-5701 65349R Operating Instructions and Warranty
IMPORTANT SAFEGUARDS wall outlet. To disconnect, turn any control to “off” then remove plug from wall outlet. 12. Do not use appliance for other than intended use. 13. Use extreme caution when disposing hot steam. 14. For household use only. When using electrical appliances, basic safety precautions should always be followed, including the following: 1. Read all instructions. 2. Do not touch hot surfaces. Use handles or knobs. 3.
Notice: Your Impressa Z5 has a 3-prong grounded plug. To reduce the risk of electrical shock this plug will fit in an outlet only one way. If the plug does not fit in the outlet contact a qualified electrician. DO NOT modify the plug in any way. JURA-CAPRESSO Jura was founded in 1931 in Switzerland. Capresso was founded in 1994 in the USA. Both companies have joined forces in the US to bring you the finest Fully Automatic Coffee Centers available anywhere.
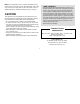
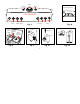
Fig. 1 1. 2. 3. 4. 5. 18. 17. 19. 16. 6. 15. 7. 14. 8. 9. 1. 2. 3. 4. 5. 6. 7. 8. 9. 10. 11. 12. 13. 14. 15. 16. 17. 18. 19. Cover lid (spring loaded) Bean container safety lid (Fig. 4) Bean container Operating panel (Fig. 3) Dual coffee spout (adjustable height) Hot water spout Cup illumination (behind coffee spouts) Used coffee container Removable tray Stainless steel grid Removable drawer Thermal milk container Auto cappuccino system Main power switch (Fig.
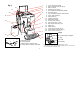
On/Off Rotary Dial Rinse Main power switch COFFEE READY Milk Cappuccino Special Hot Latte Coffee Water Lid for ground coffee Dual Fixed Spouts Grind selector Fig. 4 Fig. 3 1-Cup 2-Cup 1-Cup 2-Cup Espresso Coffee Fig. 3a Venting tip Bean container safety lid Dial Component Fig. 5 Fig. 5a 5. Fig.
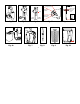
Milk & Froth (Cappuccino) Gap Milk Nozzle Fig. 5c Fig. 5d Elbow hose fits inside straight hose Milk only (Latte) Steam only (Rinsing) Coffee Nozzle Fig. 5e Fig. 5f Fig. 6 x Fig. 3 Fig. 6a Fig. 8 Fig. 7 6. Fig. 9 Fig.
.
Table of Contents Chapter Page Chapter Page Important Safeguards..........................................................2 9. One-Touch Beverage Buttons .................................14 Jura-Capresso / Address Information .................................3 10. Brewing Coffee and Espresso..............................14 Illustrations.......................................................................4–7 11. Overriding Strength and Cup Size during Brewing....15 1.
24. Water Hardness Monitor .........................................21 a. Changing the Water Hardness Monitor...............22 25. Changing Pre-Set Cup Sizes...................................22 25.1 1- and 2-Cup Buttons: Special Cup Button .........22 25.2 Cappuccino Button...............................................22 25.3 Milk Button............................................................23 25.4 Hot Water Button..................................................23 26.
1. PRODUCT WARRANTY REGISTRATION Please read the enclosed product registration form now. Fill it out and mail or fax it to us within two weeks after purchasing your machine or register online through our website: www.capresso.com. Important: This registration is part of your warranty (chapter 35). hot frothed and hot steamed milk and delivers up to 16 oz. hot water – all with a push of a button.
and brewing under high pressure is the ideal extracting process for maximum flavor and aroma. Your Jura-Capresso automatic coffee center will always produce espresso and coffee with a thick, foamy layer called "crema." The crema traps the fine aromatics and the light gaseous flavors that register on the palate. The high pressure and the short brewing time prevent the extraction of bitter oils and release less caffeine than any other brewing method.
• Never repair or open the machine yourself. All repairs should be performed only by an authorized service center. Time format .................... Volume ml/oz.................. Language ....................... Time ............................... Unit On (Auto-On) ......... PLEASE, DO... • Fill water tank with fresh, cold water only. • Remove any foreign particles (small stones) from coffee beans. • Let frozen beans thaw 3 to 4 hours before pouring them into the bean container. CUP ILLUMINATION (Fig.
beans (all coating and flavors contain sugar or sugar substances). Such coating can damage the burrs. Using such beans voids the warranty. Have your coffee store grind the sugar coated beans and use as described in the ground coffee funnel (chapter 20). Please note: If you like flavored coffees we recommend to add flavors to your coffee after brewing. This way you can use your regular coffee beans in the bean container.
Z5 enough time to completely charge its internal back-up battery. When fully charged, the internal battery will back up the clock for up to eight weeks. 9. ONE-TOUCH BEVERAGE BUTTONS (Fig. 3) The Z5 has eight beverage buttons. The first three buttons on the left side produce beverages coming out of the AutoCappuccino-System on the left side of the machine. The forth button on the left side produces hot water through the hot water spout (Fig.1,6).
is no need to pull out the drawer unless you see the message EMPTY GROUNDS (chapter 27.4). Please note: You can always stop the brewing process by pressing the Rotary Dial or any of the eight beverage buttons. This will not affect the pre-set values. per cup, e.g. if you choose 7 oz. the Z5 will actually brew a total of 14 oz. Example: The 1-cup Espresso button is programmed to STRONG and approx. 1.5 OZ. Assume you want to use this button to make a MILD 4 oz. cup.
Please note: There is a gap between the Coffee Nozzle and the fixed coffee spout. (Fig. 5e) This is necessary to assure proper coffee flow. Please note: The Milk Nozzle should always be tightly connected to the Dial Component (Fig. 5e) and the venting tip needs to be clean and inserted to assure proper frothing action (Fig. 5a). MILK 15 SEC. Hot frothed milk is automatically delivered into your cup. Frothing stops automatically. 3 OZ. NORMAL.
Please note: Cold milk will stay fresh up to 8 hours in the thermal milk container. Do not leave the milk sitting outside the refrigerator over night. Please note: If there is not enough milk in the milk container, the frother nozzle will dispense steam only. Stop the frothing action and refill the milk container. Please note: If the Dial points to the cappuccino position and you do not get froth on your milk, check the following items: a. Make sure all connections are tight. b. Remove the venting tip (Fig.
Please note: When you are finished using the cappuccino feature for the day please proceed as follows: a. Remove the Thermal Milk container and place in the refrigerator. b. Remove the flexible hose on both ends and clean with hot water. c. Pull off the Dial component and the Dual Nozzle and rinse under warm water. 18. CAPPUCCINO CLEANING CYCLE Milk contains fatty acids. Hot water alone may not always remove milk fats completely.
the program RINSE UNIT in the maintenance section to run some hot water through the coffee spouts (chapter 26.1) 20. USING PRE-GROUND COFFEE You can also use pre-ground coffee, bypassing the grinder. This comes in handy if someone requests decaf coffee or a decaf cappuccino. You can also use the pre-ground funnel for ground flavored coffee. Please note: Never fill the funnel with instant coffee. Do not fill the funnel with more than two scoops. The funnel is not a storage container.
23. CLEARYL WATER FILTER CARTRIDGE The machine comes with one Clearyl Water Filter Cartridge. The Clearyl cartridge • Reduces the water hardness up to 75%. • Removes (if present) up to 85% chlorine, up to 90% lead, up to 95% copper and up to 67% aluminum. • Cleans the water through an upward current principle (Fig. 9) just before the brewing cycle starts, ensuring freshly filtered water every time you make coffee.
"Water Hardness in Grains." The Z5 will show you the water hardness in the German hardness scale (which is a bit different from the American "Grain" scale (see chart below). You can also use the enclosed water hardness indicator strip to determine the water hardness: • Insert the stick for one second into the water you want to use. Shake off any access water and wait for one minute. • If all five fields of the test stick turn reddish, set the hardness level to 5 squares.
Please note: If your water has a high calcium content (level 5 or 6) and you use the Clearyl Filter Cartridge we recommend to decalcify the Z5 once or twice a year (chapter 26.1). • When the coffee volume in your cup is at the new desired level, push the 1-cup Coffee Button again. The display shows CONFIRMED ✔ COFFEE READY From now on, this will be the amount of coffee the Z5 will produce when you push this button. Please note: the 1-cup and 2-cup buttons are independent of each other.
25.3 MILK BUTTON You can change the pre-set milk volume. • Place a cup underneath the Auto Cappuccino System. COFFEE READY • Push and hold the Milk Button until the display reads ENOUGH MILK PRESS BUTTON. • Once you have enough frothed milk in your cup push the Milk Button again. The display shows CONFIRMED ✔. COFFEE READY Please note: You can also change the pre-set parameters for the milk button in programming (chapter 26.5) 25.4 HOT WATER BUTTON You can change the pre-set hot water amount.
Function Display Comment Time TIME Set actual time 26.7 Auto-On UNIT ON Choose an auto-on time 26.8 Auto-Off OFF AFTER Choose an auto-off time after last use 26.9 Information INFORMATION Check performance and a variety of settings 26.10 Renaming display message RENAME Rename the beverage buttons, the "on" and "off" messages 26.11 Language LANGUAGE Change the display to another language 26.12 Display DISPLAY Choose cup size info. in OZ. to ML.
d. Push the Rotary Dial to confirm. CONFIRMED ✔ e. AROMA. To change another beverage button start with a. a. Push the Rotary Dial. SELECT PRODUCT. b. Push the beverage button for which you want to change the temperature, e.g. the 1-cup Espresso Button. The display shows 1 ESPRESSO HIGH. c. Turn the Rotary Dial and select NORMAL (example). d. Push the Rotary Dial to confirm. CONFIRMED ✔ e. TEMPERATURE. To change another beverage button start with a. again. 26.4 CAPPUCCINO PROGRAMMING Chapter 25.
display without using any milk COFFEE READY • Push and hold the Rotary Dial until you hear a beep and the display shows FILTER. • Turn the dial until the display shows: MILK a. Push the Rotary Dial. The display shows MILK 20 SEC b. Turn the Rotary Dial until the desired duration is displayed, e.g. MILK 30 SEC. c. Push the Rotary Dial to confirm. CONFIRMED ✔ Now the display shows MILK 30 SEC. d. Turn the Rotary Dial until the display shows EXIT and push the Rotary Dial.
CONFIRMED ✔ and displays UNIT ON and the selected time. f. Turn the Rotary Dial until the display shows EXIT and push the Rotary Dial. COFFEE READY b. Turn the Rotary Dial until the hours are set. c. Push the Rotary Dial to confirm. The display shows TIME MINUTES. d. Turn the Rotary Dial until the minutes are set. e. Push the Rotary Dial to confirm. Display shows CONFIRMED ✔ and shows the actual time. f. Turn the Rotary Dial until the display shows EXIT and push the Rotary Dial. COFFEE READY.
26.10 INFORMATION COFFEE READY • Push and hold the Rotary Dial until you hear a beep and the display shows FILTER. • Turn the dial until the display shows: INFORMATION. a. Push the Rotary Dial 1 ESPRESSO 15 COUNT (example). It shows how often coffee was prepared with this button. b.
• Turn the dial until the display shows: LANGUAGE a.Push the Rotary Dial ENGLISH. b.Turn the Rotary Dial until the desired language is displayed. c.Push the Rotary Dial to confirm. d.Turn the Rotary Dial until the display shows EXIT and push to confirm. The display will show the equivalent of Coffee Ready in the language you selected. 27.1 FILL WATER TANK The display shows WATER TANK FILL when the water level is low. This prevents the pump from running dry. You cannot brew coffee.
Important: If you pull out the drawer in between, you must empty the used coffee container. The Z5 assumes that the used coffee container will be emptied. If you do not empty the container, used coffee will overflow inside the machine and can cause serious damage to the coffee release mechanism. If the display shows COFFEE BIN MISSING, the tray is not attached to the drawer (Fig. 2,9). Please note: The Z5 does not sense whether or not the used coffee container is inserted (Fig. 2,8).
29. DECALCIFYING PROCESS The machine has an integrated decalcifying program. This program takes about 50 minutes. When the display shows COFFEE READY DESCALE it is time to decalcify the machine. You can still make coffee. However, it is highly recommended that you decalcify the machine within the next 3 to 4 days. Please note: If you use the Clearyl water cartridge and the display shows COFFEE READY DESCALE then your cartridge function is not activated.
l. At the end of the decalcifying cycle the display shows MACHINE IS HEATING. After a few seconds the Z5 will automatically run a rinse cycle through the Dual Coffee Spouts. RINSING. m. TRAY / GROUNDS EMPTY Remove the containers and remove and empty the drawer and used coffee container and replace complete assembly (Fig. 2). COFFEE READY.
Reason: The ground coffee funnel or the internal brewing chamber is clogged. Solution: Place a cup underneath the Dual Coffee Spout and run an extra rinse cycle. COFFEE READY • Push and hold the Rotary Dial until display shows FILTER. • Turn the dial until the display shows: MAINTENANCE • Push the dial and select RINSE UNIT. • Push the Rotary Dial again. Place a cup underneath the Dual Coffee Spouts and push the Rinse Button. COFFEE READY The milk you are using is "too heavy".
ERROR 2 Your machine is too cold. The heating sensor does not react. • Turn the machine off. • Keep the machine at normal room temperature (65º F or higher) for 2 hours . • Then turn it on again. If display still shows ERROR 2, call customer service. • Decalcifying tablets (large square tablets) - Model #61848 Please note: You must use decalcifying tablets if you do not use the Clearyl cartridge. You can order these supplies: • with the enclosed mail order form or • through our website www.capresso.
This warranty does not cover: • Any machine NOT distributed by JURA-CAPRESSO within the United States. • Any machine not purchased from an Authorized Dealer. • Damage caused by accident, abuse, negligence, misuse, improper operation or failure to follow instructions contained in this manual. • Any service or alteration performed by an unauthorized person, company or association. • Damage caused by neglecting and omitting maintenance, cleaning and decalcifying cycles.
Jura-Capresso, LLC 81 Ruckman Road, Closter, NJ 07624 201-767-3999 • Fax: 201-767-9684 Customer Service: 1-800-220-5701 Email: contact@capresso.com • Website: www.capresso.