The IMPRESSA S9 One Touch Manual The ‘IMPRESSA Manual’ has been awarded the seal of approval by the independent German Technical Inspection Agency, TÜV SÜD, due to its easy-to-understand style, its thoroughness and coverage of safety aspects.
Table of contents Your IMPRESSA S9 One Touch Control elements 4 6 Proper use For your safety 6 The IMPRESSA S9 One Touch Manual 8 Symbol description ....................................................................................................................................... 8 1 IMPRESSA S9 One Touch 9 Connector System© ....................................................................................................................................10 JURA on the Internet ........................
Table of contents Automatic switch-off ...................................................................................................................................31 Rinses ............................................................................................................................................................ 32 Restore factory settings .............................................................................................................................
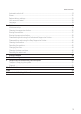
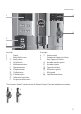
Control elements Control elements 8 1 9 2 10 11 3 12 13 4 14 15 5 6 7 Figure: IMPRESSA S9 Platinum 1 2 3 4 5 6 7 4 Bean container cover Bean container with aroma preservation cover Water tank with handle Power switch and power cable (back of machine) Coffee grounds container Drip tray Cup platform 8 9 10 11 12 13 14 15 Fineness of grind switch Cup tray Cover of filler funnel for pre-ground coffee Filler funnel for pre-ground coffee Connector System© for removable frothers Professional Cappuccino
Control elements 4 1 5 2 3 Front left 1 2 3 f Q c i 4 o d e v Display Rotary Switch cover Rotary switch On/off button Maintenance button 1 Espresso button 2 Espressi button 1 Coffee button 2 Coffees button Coffee à la Carte button Pre-ground coffee button Front right 4 ö Selector switch 5 Professional Cappuccino Frother 6 Easy Cappuccino Frother a Hot water portion symbol m Hot water symbol p Cappuccino button z Milk portion symbol n Milk symbol q Latte Macchiato button The Connector System© permits
Important information Proper use The machine has been designed and built for domestic use. It should only be used to prepare coffee and to heat milk and water. Use for any other purpose will be deemed improper. JURA Elektroapparate AG cannot accept any responsibility for the consequences of improper use. Before using the machine always carefully read and comply with all these instructions. Keep this manual close to the IMPRESSA and pass it on to the next user.
Important information A defective machine is not safe and could cause injury or fire. To avoid damage and any associated risk of injury or fire: Z Never allow the power cable to loosely hang down. The power cable can be tripped over or damaged. Z Protect your IMPRESSA from environmental influences such as rain, frost and direct sunlight. Z Do not put the IMPRESSA, cable or connections in water. Z Do not put the IMPRESSA or any individual parts in the dishwasher.
The IMPRESSA S9 One Touch Manual The IMPRESSA S9 One Touch Manual You are holding the manual for your IMPRESSA S9 One Touch in your hand. It will help you to familiarize yourself with your IMPRESSA safely and quickly and teach you the full range of facilities it offers. Chapter 2, ‘Preparing and using your IMPRESSA for the first time’, explains step-by-step how to set up and prepare the IMPRESSA.
1 IMPRESSA S9 One Touch 1 IMPRESSA S9 One Touch Coffee that fulfils your wildest dreams With the new flagship of the IMPRESSA S range, cappuccino and latte macchiato are prepared at the touch of a button without you having to move the cup. With its elegant platinum styling and upgraded design, this high-quality product is fully in keeping with contemporary trends and exudes superiority, solidity and competence. It impressively demonstrates these attributes with each coffee speciality that you enjoy.
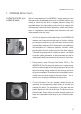
1 IMPRESSA S9 One Touch Z Professional technology for the home: The active bean monitoring feature of your IMPRESSA S9 banishes the sound of empty rotating coffee grinders and the inconvenience of half-full cups once and for all. It always shows you in good time when the coffee beans need replenishing. The filling level of the 280 gram bean container is continuously optically monitored.
2 Preparing and using for the first time 2 Preparing and using for the first time This chapter provides you with the information you need to use your IMPRESSA without any problems. You will prepare your IMPRESSA step-by-step for your first coffee experience. Setting up When setting up your IMPRESSA, please note the following: Z Set the IMPRESSA down on a horizontal surface that is not sensitive to water. Z Choose a spot for your IMPRESSA which is protected against overheating.
2 Preparing and using for the first time First-time use WARNING If the machine is operated with a defective power cable, there is a danger of electric shock. T Never use a machine which has a defective power cable. Precondition: The water tank and bean container are full. T Insert the mains plug into a power socket. 3 T Switch on the IMPRESSA using the power switch on the back of the machine. The on/off button Q lights up (standby). Q T Press the on/off button to switch the IMPRESSA on.
2 Preparing and using for the first time E If you have not been able to use the machine for the first time correctly and fully, contact customer support in your country (see ‘JURA contact details / Legal information’). Using and activating filter Your IMPRESSA no longer has to be descaled if you are using CLARIS filter cartridges. @ You can also try out the ‘Insert filter’ operation online. Visit the Knowledge Builder at www.jura.com. E Perform the ‘Insert filter’ operation without interruptions.
2 Preparing and using for the first time T Place a receptacle (at least 500 ml) under the frother. E If you are using the Professional Cappuccino Frother, set the selection lever of the frother to the steam position n. c T Press the maintenance button. FILTER RINSING, water flows out of the frother. E You can interrupt rinsing of the filter at any time by pressing any button. E The water may be slightly discoloured. This is not harmful to health and does not affect the taste.
2 Preparing and using for the first time k T Keep the Rotary Switch pressed until MAINTENANCE appears. g T Turn the rotary switch until HARDNESS 16°dH is displayed. k T Press the Rotary Switch to enter the programme item. 16°dH g T Turn the Rotary Switch until 25°dH is displayed. k T Press the Rotary Switch to confirm the setting. CONFIRMED w appears briefly on the display. HARDNESS 25°dH g T Turn the Rotary Switch until EXIT is displayed. k T Press the Rotary Switch to exit programming mode.
2 Preparing and using for the first time Example: To change the fineness of grind during coffee preparation, proceed as follows: T Open the cover of the bean container. T Place a cup under the coffee spout. o T Press the 1 Coffee button. The grinder starts and 1 COFFEE is displayed. T Turn the fineness of grind switch to the desired position while the grinder is running. The coffee will be prepared and the fineness of grind is adjusted.
2 Preparing and using for the first time Switching off When you switch your IMPRESSA off, the spouts with which a coffee speciality or milk have been prepared are rinsed. T Place a receptacle under the coffee spout and the frother. Q T Press the on/off button. MACHINE RINSING appears on the display, and the coffee spout is rinsed. SPOUT RIGHT / PRESS RINSE. c T Press the maintenance button. MACHINE RINSING, the right coffee spout is rinsed. The IMPRESSA is switched off, and the on/off button Q lights up.
3 Familiarising yourself with the control options 3 Familiarising yourself with the control options With the IMPRESSA, you can prepare an excellent coffee or milk speciality at the touch of a button. You also have the option of adjusting the coffee strength and temperature, as well as the amount of water to your personal taste. This chapter will allow you to become familiar with all control options with the aid of examples.
3 Familiarising yourself with the control options One-off settings before and during preparation It is possible to make various settings before and during preparation. These one-off settings are always follow the same model and are not stored. Changing the coffee strength before preparation The coffee strength of Coffee à la Carte can be changed before preparation.
3 Familiarising yourself with the control options T Open the cover of the Rotary Switch. o T Press the 1 Coffee button. 1 COFFEE and the pre-set coffee strength is displayed. The brewing operation starts and the coffee flows into the cup. g T Turn the Rotary Switch during the brewing operation until 1 COFFEE / 110 ML is displayed. The set amount of water flows into the cup. Preparation stops automatically. ENJOY appears on the display. COFFEE READY is then displayed.
3 Familiarising yourself with the control options Permanent settings in programming mode You can easily adjust your IMPRESSA to your personal coffee blends and specialities. You can navigate through the easy-to-understand programme steps and make permanent settings simply by turning and pressing the Rotary Switch.
3 Familiarising yourself with the control options Programme item Subitem Explanation RESET PRODUCT, ALL PROD., ALL, EMPT.SYST. T Reset the permanently set values of all products to the factory settings. T Keep track of all prepared coffee and milk specialities and view the maintenance status. INFORMATION SETTINGS ML/OZ T Select the unit of the amount of water. LANGUAGE T Select the desired language. EXIT T Exit programming mode. Settings in programming mode always follow the same model.
3 Familiarising yourself with the control options k T Press the Rotary Switch to exit the programme item. SELECT PRODUCT g T Turn the Rotary Switch until EXIT is displayed. k T Press the Rotary Switch to exit the programme item. PRODUCTS g T Turn the Rotary Switch until EXIT is displayed. k T Press the Rotary Switch to exit programming mode.
4 Preparation at the touch of a button 4 Preparation at the touch of a button In this chapter you will find out how to prepare coffee and milk specialities and hot water without making further settings. Chapter 3, ‘Familiarising yourself with the control options’, will teach you how to adjust the settings to your personal preferences. Alternatively, you can use Chapter 5, ‘Permanent settings in programming mode’.
4 Preparation at the touch of a button T Place a coffee cup under the coffee spout. o T Press the 1 Coffee button. 1 COFFEE and the pre-set coffee strength are displayed. The pre-set amount of water flows into the cup. Preparation stops automatically. ENJOY appears on the display. COFFEE READY is then displayed. E To prepare 2 coffees, place two cups under the coffee spout and press the 2 Coffees button d. Coffee à la Carte The coffee strength of Coffee à la Carte can be changed before preparation.
4 Preparation at the touch of a button T Place a glass under the frother. E If you are using the Professional Cappuccino Frother, set the selector switch to the Milk Foam position p. q T Press the Latte Macchiato button. LATTE MAC. and the coffee strength are displayed. The milk foam is then prepared. The operation stops automatically when pre-set amount of milk is reached. E A brief pause follows during which the hot milk separates from the milk foam.
4 Preparation at the touch of a button T Open the cover of the filler funnel for pre-ground coffee. T Open the cover of the Rotary Switch. v T Press the Pre-ground coffee button. FILL PRE-GROUND / COFFEE READY T Place one level measuring spoon of pre-ground coffee into the filler funnel. T Close the cover of the filler funnel for pre-ground coffee. o T Press the 1 Coffee button. 1 COFFEE, the pre-set amount of water flows into the cup. Preparation stops automatically. ENJOY appears on the display.
4 Preparation at the touch of a button ä T Press the selector switch. MILK, the milk foam is being prepared. Preparation stops automatically when the pre-set amount of milk is reached. COFFEE READY is shown on the display. To ensure that the frother works perfectly, you should rinse and clean it regularly. The description for this can be found in Chapter 6 ‘Maintenance – Cappuccino frother’.
5 Permanent settings in programming mode 5 Permanent settings in programming mode Products With the PRODUCTS programme item you can enter individual settings for all coffee and milk specialities as well as hot water. The following permanent settings can be made: Product Amount Coffee strength Temp.
5 Permanent settings in programming mode k T Press the Rotary Switch to enter the programme item. SELECT PRODUCT E Next select the product button for which you would like to make settings. No product is prepared during this procedure. q T Press the Latte Macchiato button. COFFEE 45 ML k T Press the Rotary Switch to enter the programme item. COFFEE 45 ML g T Turn the Rotary Switch until COFFEE 40 ML is displayed. k T Press the Rotary Switch to confirm the setting.
5 Permanent settings in programming mode Energy-saving mode (Energy Save Mode, E.S.M.©) You can also set various energy-saving modes on your IMPRESSA: Z SAVE NO U Your IMPRESSA is continuously ready for use. U All coffee and milk products, as well as hot water, can be prepared without having to wait. Z SAVE LEVEL 1 U Your IMPRESSA is only continuously ready for use for coffee products and hot water. U The machine has to heat up before milk preparation. Z SAVE LEVEL 2 U Approx.
5 Permanent settings in programming mode E The programmable switch-off time can be adjusted between 0.5 and 15 hours. Example: Proceed as follows to change the automatic switch-off time from 2 H to 1 H. Precondition: COFFEE READY is displayed. T Open the cover of the Rotary Switch. k T Keep the Rotary Switch pressed until MAINTENANCE appears. g T Turn the Rotary Switch until OFF AFTER 2 H is displayed. k T Press the Rotary Switch to enter the programme item.
5 Permanent settings in programming mode g T Turn the Rotary Switch until CAPP RINSE NOW is displayed. k T Press the Rotary Switch to confirm the setting. CONFIRMED w appears briefly on the display. CAPP RINSE NOW g T Turn the Rotary Switch until EXIT is displayed. k T Press the Rotary Switch to exit the programme item. RINSES g T Turn the Rotary Switch until EXIT is displayed. k T Press the Rotary Switch to exit programming mode.
5 Permanent settings in programming mode i T Press the Espresso button. CONFIRMED w appears briefly on the display. The settings for ‘Espresso’ are reset to the factory settings. RESET / PRODUCT g T Turn the Rotary Switch until RESET / EXIT is displayed. k T Press the Rotary Switch to exit the programme item. RESET g T Turn the Rotary Switch until EXIT is displayed. k T Press the Rotary Switch to exit programming mode.
5 Permanent settings in programming mode k T Press the Rotary Switch to enter the programme item. LANGUAGE ENGLISH g T Turn the Rotary Switch until SPRACHE DEUTSCH (example) is displayed. k T Press the Rotary Switch to confirm the setting. GESPEICHERT w (example) appears briefly on the display. SPRACHE DEUTSCH (example) g T Turn the Rotary Switch until EXIT is displayed. k T Press the Rotary Switch to exit programming mode.
6 Maintenance 6 Maintenance Your IMPRESSA has the following integrated maintenance programmes: Z Clean cappuccino frother Z Rinse machine Z Rinse cappuccino frother Z Clean machine Z Decalcify machine Z Change filter E Clean or descale the machine or change the filter whenever the appropriate prompt is displayed. Maintenance tips To ensure that you get many years of reliable service out of your IMPRESSA and to guarantee the optimum coffee quality, the machine requires daily maintenance.
6 Maintenance Precondition: COFFEE READY is displayed. T Open the cover of the Rotary Switch. k T Keep the Rotary Switch pressed until MAINTENANCE appears. k T Press the Rotary Switch to enter the programme item. CLEAN CAPPUCCINO k T Press the Rotary Switch. CLEANER FOR CAPPU., the maintenance button c lights up. T Pour 250 ml of fresh water into a container and add one capful (max. 15 ml) of Cappuccino Cleaner. T Immerse the milk pipe in the receptacle with the cleaning solution.
6 Maintenance When the IMPRESSA is switched off, a rinse operation is automatically initiated. You can initiate the rinse operation manually at any time. Precondition: COFFEE READY is displayed. T Place a receptacle under the coffee spout. T Open the cover of the Rotary Switch. k T Keep the Rotary Switch pressed until MAINTENANCE appears. k T Press the Rotary Switch to enter the programme item. CLEAN CAPPUCCINO f T Turn the Rotary Switch until RINSE MACHINE is displayed.
6 Maintenance Starting rinsing manually You can initiate the ‘Rinsing the cappuccino frother’ operation manually. Precondition: COFFEE READY is displayed. T Place a receptacle under the frother. E If you are using the Professional Cappuccino Frother, turn the selection lever to the steam position n. T Open the cover of the Rotary Switch. k T Keep the Rotary Switch pressed until MAINTENANCE appears. k T Press the Rotary Switch to enter the programme item.
6 Maintenance Disassembling and rinsing the Easy Cappuccino Frother T Carefully remove the frother from the Connector System© by twisting slightly. T Dismantle the frother completely. T Rinse all the frother parts thoroughly under running water. T Reassemble the frother. E Ensure that the individual parts are correctly and firmly attached to one another to ensure optimum function of the frother. T Firmly attach the frother to the Connector System©.
6 Maintenance T Empty the drip tray and coffee grounds container and put them back into the machine. PRESS RINSE, the maintenance button c lights up. T Place a receptacle under the coffee spout and the frother. c T Press the maintenance button. CLEANS, the cleaning operation starts. The process is interrupted. ADD TABLET / PRESS RINSE, the maintenance button c lights up. T Open the cover of the filler funnel for pre-ground coffee. T Insert a JURA cleaning tablet into the filler funnel.
6 Maintenance Descaling the machine CAUTION The IMPRESSA builds up deposits of limescale over time and automatically prompts you to descale it when necessary. The degree of calcification depends on the degree of hardness of your water. If the descaling agent comes into contact with the skin or eyes, this can cause irritation. T Avoid contact with the skin or eyes. T Rinse the descaling agent off with clean water. Should you get any descaling agent in your eye, see a doctor.
6 Maintenance T Empty the drip tray and coffee grounds container and put them back into the machine. SOLVENT IN TANK T Remove the water tank and empty it. T Completely dissolve the contents of one blister (3 JURA descaling tablets) in a container that holds 600 ml of water. This may take several minutes. T Pour the solution into the empty water tank and insert it in the machine. SOLVENT IN TANK / PRESS RINSE, the maintenance button c lights up. T Remove the frother from the Connector System©.
6 Maintenance MACHINE RINSING, water flows out of the coffee spout. The operation stops automatically, EMPTY TRAY. T Empty the drip tray and coffee grounds container and put them back into the machine. The descaling operation is now complete. Your IMPRESSA heats up and is once again ready to use. E If the descaling operation stops unexpectedly, rinse the water tank thoroughly. Manual descaling You can initiate the ‘Descaling the machine’ operation manually.
6 Maintenance Precondition: COFFEE READY / CHANGE FILTER is displayed, and the maintenance button c lights up. c T Press the maintenance button. DURATION 2 MIN. / START YES E If you want to change the filter at a later point in time, turn the Rotary Switch until START NO is displayed. Exit the maintenance programme by pressing the Rotary Switch. The prompt ‘Change filter’ remains on the display. c T Press the maintenance button. CHANGE FILTER / PRESS RINSE T Remove the water tank and empty it.
6 Maintenance Manual filter change You can initiate the ‘Changing the filter’ operation manually. Precondition: The filter is activated and COFFEE READY is shown on the display. T Open the cover of the Rotary Switch. k T Keep the Rotary Switch pressed until MAINTENANCE appears. k T Press the Rotary Switch to enter the programme item. CLEAN CAPPUCCINO g T Turn the Rotary Switch until CHANGE FILTER is displayed. k T Press the Rotary Switch. DURATION 2 MIN.
6 Maintenance Descaling the water tank Limescale deposits may form in the water tank. To ensure correct function of your IMPRESSA, you should descale the water tank from time to time. T Remove the water tank. T If you use a CLARIS filter cartridge, remove this. T Descale the tank with a mild, commercially available descaling agent in accordance with the instructions of the manufacturer. T Rinse the water tank with clean water afterwards. T If you use a CLARIS filter cartridge, insert this again.
7 Display messages 7 Display messages Message Cause/Result Action FILL WATER TANK The water tank is empty. You cannot prepare any coffee products, hot water or milk products. T Fill the water tank (see Chapter 2, ‘Preparing and using for the first time – Filling the water tank’). EMPTY GROUNDS The coffee grounds container is full. You cannot prepare any coffee products, but you can prepare hot water or milk. T Empty the coffee grounds container and the drip tray. EMPTY TRAY The drip tray is full.
7 Display messages Message Cause/Result Action COFFEE READY / CLEAN NOW After 250 preparations the IMPRESSA will prompt you to clean it. T Clean the machine (see Chapter 6, ‘Maintenance – Cleaning the machine’). COFFEE READY / The IMPRESSA is prompting DECALCIFY MACHINE you to descale it. T Descale the machine (see Chapter 6, ‘Maintenance – Descaling the machine’). COFFEE READY / DECALCIFY NOW The IMPRESSA is prompting you to descale it.
8 Troubleshooting 8 Troubleshooting Problem Cause/Result Action Grinder is making a very loud noise. There are foreign objects in the grinder. T Contact Customer Support in your country (see ‘JURA contact details / Legal information’). The frother does not produce enough milk foam or milk sprays from the cappuccino frother. The cappuccino frother is dirty or incorrectly attached. T Rinse and clean the cappuccino frother (see Chapter 6, ‘Maintenance – Cappuccino frother‘).
8 Troubleshooting Problem Cause/Result Action ERROR 2 is displayed. If the machine was exposed to the cold for a long period of time, it is disabled from heating up due to safety reasons. T Warm up the machine at room temperature. Other ERROR messages are displayed. – T Turn the IMPRESSA off at the power switch. Contact Customer Support in your country (see ‘JURA contact details / Legal information’).
9 Transport and environmentally neutral disposal 9 Transport and environmentally neutral disposal Transport / Emptying the system Keep the packaging for your IMPRESSA. It should be used to protect the machine during transportation. In order to protect the IMPRESSA from frost during transportation, the system must be emptied. Precondition: COFFEE READY is displayed. k T Keep the Rotary Switch pressed until MAINTENANCE appears. g T Turn the Rotary Switch until RESET is displayed.
10 Technical data 10 Technical data Voltage 220 –240 V ~, 50 Hz Power 1450 W Safety test S Energy SAVE NO 40 Wh Energy SAVE LEVEL 1 20 Wh Energy SAVE LEVEL 2 15 Wh Pump pressure Static max. 15 bar Holding capacity of water tank 2.7 l Holding capacity of bean container 280 g Holding capacity of coffee grounds container Approx. 16 servings Cable length Approx. 1.1 m Weight 11.9 kg Dimensions (W x H x D) 34.
Index Index A B Disassembling and rinsing 40 Bean container Troubleshooting 50 Espresso 24 F Factory settings Restore factory settings 33 Filler funnel for pre-ground coffee 4 Filling Cappuccino 25 Cappuccino frother Bean container 11 Water tank 11 Cleaning 36 Easy Cappuccino Frother 10 Professional Cappuccino Frother 10 Rinsing 38 Filter Changing 44 Using and activating 13 CLARIS filter cartridge Fineness of grind Changing 44 Using and activating 13 Adjusting grinder 15 Fineness of grind s
Index M Machine R Cleaning 40 Descaling 42 Rinsing 37 Setting up 11 Switching off 17 Switching on 16 Restore factory settings 33 Restore factory settings 33 Rinses 32 Rinsing Cappuccino frother 38 Machine 37 Maintenance 36 Maintenance tips 36 Milk Rotary Switch 5 S Hot 27 Milk portion 27 Milk foam 27 O P Reset Safety 6 Selector switch 5 Settings Entering a default setting for the amount of water for a cup size 20 One-off settings before and during preparation 19 Permanent settings in programm
Art. 69193/S9/en/201002 JURA contact details / Legal information JURA Elektroapparate AG Kaffeeweltstrasse 10 CH-4626 Niederbuchsiten Phone: +41 62 38 98 233 @ Contact information is available on the company website at www.jura.com. Directives The machine complies with the following EU directives: Z 2006/95/EC – Low Voltage Directive Z 2004/108/EC – Electromagnetic Compatibility Z 2009/125/EC – Ecodesign Technical changes We reserve the right to make technical changes.