
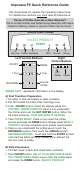
User Guide

Push and hold the P button until two Red Arrows show in
the display. First message: FILTER NO. Repeatedly pushing
the right arrow accesses different factory settings. Push the
P button again to return to SELECT PRODUCT.
Here is how to change some of the settings (for all other set-
tings refer to the Operating Instructions).
a) Programming Cup Size for Sensor Touch Symbols
BIG CUP, COFFEE and ESPRESSO symbols can be pro-
grammed between 1 and 8 oz. each (30 to 240 ml).
1. Press and hold the
P button until FILTER NO. Press the
Right Arrow 4 times: WATER QUANTITY
2. Touch ST@RT and touch the cup symbol for which you
want to change the cup size, e.g. COFFEE 5 OZ (120ml)
3. Press either arrow repeatedly to change the cup size.
Touch ST@RT to confirm. WATER QUANTITY.
4. You can touch another cup symbol and proceed as above.
5. Press
P button to return to SELECT PRODUCT.
b) Pr
ogramming 1-CUP Button
The 1-CUP button can be programmed between 1 and 8 oz.
The 2-CUP button delivers always twice as much coffee.
1. Press and hold the
P button until FILTER NO. Press the
Right Arrow 5 times: 1-CUP 4 OZ (120 ML)
2. Press either arrow repeatedly to change. Touch ST@RT to
confirm. 1-CUP STRONG. Touch one of the bean symbols
to select
MILD, NORMAL or STRONG, e.g. 1-CUP NORMAL.
Touch ST@RT to confirm. 1-CUP NORMAL.
3. Press P to return to SELECT PRODUCT.
c) Pr
ogramming Hot Water Portion
Hot water portion can be programmed between 1 and 16 oz.
1. Press and hold the P button until FILTER NO. Press the
Right Arrow 7 times: WATER PORTION
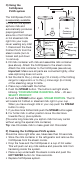
2. Touch ST@RT. PRESS KEY. Place a cup under the frother
and press the
HOT WATER button. Hot water will be
released. ENOUGH WATER? PRESS KEY. When the
desired amount of hot water is in your cup press the HOT
WATER button to stop. WATER PORTION. This amount
of hot water is now programmed.
3. Press
P to return to SELECT PRODUCT.
d) Setting T
ime and Programming Auto-On
1. Press and hold the P button until FILTER NO. Press the
Right Arrow 8 times: TIME --.--
2.
Touch
ST@R
T
. Repeatedly touch the ar
rows to set the
hours (military time!). Touch ST@RT to confirm.
3. Repeatedly touch the arrows to set the minutes. Touch
ST@RT to confirm.
4. Press the Right Arrow once UNIT ON --.--. Touch ST@RT.
5.
Set the Auto-On time like the time (arrows for hours,
ST@RT to confirm, arrows for minutes, ST@RT to confirm.
6. Press P to return to SELECT PRODUCT.
The F9 will turn on automatically at the preset time.