Professional Espresso & Cappuccino Machine Model #118 • Instructions • Warranty 1050W / 120V / 60 Hz
Read this manual thoroughly before using and save it for future reference IMPORTANT SAFEGUARDS Before using the electrical appliance, the following basic precautions should always be followed including: 1. Read all instructions and any other literature included in this packaging prior to using this appliance. 2. Before using check that the voltage of the wall outlet corresponds to rated voltage marked on the machine. 3.
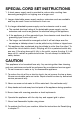
SPECIAL CORD SET INSTRUCTIONS 1. A short power supply cord is provided to reduce risks resulting from becoming entangled in or tripping over a longer cord. 2. Longer detachable power-supply cords or extension cords are available and may be used if care is exercised in their use. 3. If a longer detachable power-supply cord or extension cord is used, a. The marked electrical rating of the detachable power-supply cord or extension cord must be as great as the electrical rating of the appliance, b.
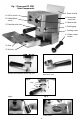
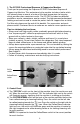
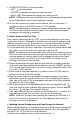
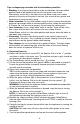
Fig. 1 Capresso EC PRO User Components F. Water tank lid A. Off/On switch G. Removable water tank B. Coffee/Steam switch H. Selector dial C. Portafilter with sieve I. Frothing grip J. Frothing wand K. Coffee scoop/ tamper D. Grid E. Drip tray Bottomless portafilter with 1-cup bottomless sieve Double spout portafilter with 2-cup sieve Fig. 2 bump notch Fig. 3 Fig. 4 Brew Head 4.
1. The EC PRO Professional Espresso & Cappuccino Machine Thank you for purchasing the Capresso EC PRO Professional Espresso & Cappuccino Machine. This professional style machine includes a boiler which will internally keep a reserve of water at the ideal temperature for brewing which provides more consistent results. The EC PRO includes two different portafilters: one for convenience, one for control.
c) The SELECTOR DIAL has three positions: • LEFT ( ) brewing coffee, • CENTER (•) standby, brewing and steaming stops, • RIGHT ( ) steam production through the frothing wand NOTE: It is important to have the Selector Dial in the corresponding position to the Coffee/Steam switch when brewing or frothing. d) To turn the machine off, make sure the Selector Dial is in the center "•" position and press the OFF/ON switch to "OFF" position.
b) Remove the water tank and open the tank lid to fill it with fresh water, the water level should not exceed the "MAX" mark on the tank. Then place the tank into the appliance properly, pushing down firmly to engage the base valve. Make sure the two hooks on the back of the water tank are inserted into the openings in the back of the machine. c) Switch "ON" the machine. The "ON" button indicator will illuminate orange. Make sure the Coffee/Steam switch is pressed to the left in the Coffee position " ".
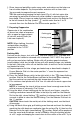
espresso for the first time. Use the large 2-cup sieve with the double spout portafilter. The large 2-cup sieve is pressurized and will produce a good crema by creating extra pressure within the sieve to enrich the crema. We recommend beginners use the double spout portafilter and 2-cup sieve to create the optimal brew, quickly and easily. a. Place the 2-cup sieve firmly inside of the double spout portafilter. See Fig 2 for proper inserting of the sieve.
Tips on diagnosing extraction with the bottomless portafilter: • Blonding: A very light colored shot may be an indication that more coffee grounds need to be added to the sieve or the grind is too coarse. Alternatively, a shot that is too dark can mean there is too much coffee grounds in the sieve or the grind is too fine. Use a conical burr grinder and experiment to fine the perfect grind. • Under-extraction: Occurs when coffee is weak in taste.
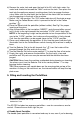
j) Rinse sieve and portafilter under warm water and make sure the holes are free of coffee deposits. Dry the portafilter and sieve with a clean cloth. You are ready to prepare the next espresso. TIP: We recommend purging the brew head, (Fig. 4) with hot water after removing the portafilter to ensure all coffee residue is removed from the brew head.
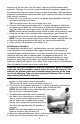
create a cyclone with the milk so it spins rapidly for about 30-40 seconds. Then plunge the frothing wand all the way into the milk until the desired temperature is reached. TIP: Milk will start to scorch around 176°F so we suggest to stop frothing before the temperature reaches 170°F. f) When the desired amount of froth is reached or temperature has reached 170°F, turn the Selector Dial to the "•" position.
CAUTION! Never remove the frothing wand from the milk while the Selector Dial is still in the steam position " ". Always turn the selector dial to the center "•" position before removing the frothing wand from the milk or it could cause hot milk to splatter. NOTE: Carefully clean the frothing wand with a wet cloth immediately after steaming to avoid milk build up. Take care to avoid contact with hot parts. c) Pour the steamed milk into the prepared espresso, now the latte is ready.
b) Do not immerse the appliance in water or any other liquid. c) Do not use harsh abrasives to clean. Wipe down the appliance housing with a damp cloth. NOTE: Do not clean with alcohol or solvent cleanser. d) Wipe the brew head with a damp cloth. CAUTION! HOT! Danger of burning or scalding! Allow the appliance to cool down completely before cleaning. e) Rinse the water tank, the grid and drip tray regularly with water. f) Empty the drip tray regularly and clean with hot soapy water.
f) Turn the Selector Dial to the center "•" position to stop the process. g) Let the machine sit for approximately 10 minutes. Decalcifying the Frothing Wand h) Fill a pitcher with 6 to 8 oz. of cold water and immerse the frothing wand into the cold water. i) Ensure the Coffee/Steam switch is in the " " steam/frothing position. Turn the Selector Dial to the right, steam/frothing " " position and let steam pass through for about 30 seconds. Repeat this process three or four times.
Symptom Cause Espresso only brews out in Coffee grounds are too fine drops. or packed down too firmly. Corrections Do not tamp coffee grounds so firmly. Use a coarser grind of coffee. Coffee/Steam switch is not in the correct position. Ensure the Coffee/Steam switch is in the left, cup " position. Machine is blocked by calcium deposits. Decalcify the appliance. See chapter 11. No crema. Coffee is old or too dry. " Use fresh coffee that is ground right before brewing.
Symptom Cause Uneven cup filling. Outlet in sieve or portafilter blocked. Uneven dosing or tamping of ground coffee into sieve. Loud pump noise/no water No water in water tank. from brew head. Corrections Remove sieve from portafilter. Clean with stiff brush. Clean portafilter. Evenly distribute the finely ground coffee into the sieve and tamp firmly and evenly. Fill water tank with fresh, cold water. Air blockage in pump. Coffee/Steam switch should be in the steam position.
Symptom Cause Corrections No steam produced from The Coffee/Steam switch is the frothing wand. not in the correct position. Ensure the Coffee/Steam switch is in the right, steam/frothing “ ” position The green ready indicator is not illuminated. Only after the Coffee/Steam switch is in the steam position and the ready indicator is illuminated, the steam can be used to froth. Frothing wand blocked by milk or calcium deposits. Turn the Selector Dial to the center "•" position.
13. LIMITED ONE-YEAR WARRANTY This warranty covers your CAPRESSO machine, model #118 espresso machine. The model # can be found on the bottom of the machine. This warranty is in effect for one year from the date of the first consumer purchase. This warranty covers all defects in materials or workmanship (parts and labor). This warranty does not cover: • Any machine not purchased from an Authorized JURA CAPRESSO Dealer. • Commercial use of machine.
Jura Capresso Inc. 81 Ruckman Road, Closter, NJ 07624 201-767-3999 • Fax: 201-767-9684 Website: www.capresso.