CoffeeTEAM Therm 10-Cup Digital Coffee Maker / Conical Burr Grinder Combination • Operating Instructions • Warranty Model #478 1000W/120V~/60Hz Read this manual thoroughly before using and save it for future reference
IMPORTANT SAFEGUARDS When using electrical appliances, basic safety precautions should always be followed, including the following: 1. Read all instructions. 2. Do not touch hot surfaces. Use handles or knobs. 3. To protect against fire, electric shock and injury to persons, do not immerse cord, plugs, or body of machine in water or other liquid. 4. Close supervision is necessary when any appliance is used by or near children. 5. Unplug from outlet when not in use and before cleaning.
A. A short power supply cord is provided to reduce the risk resulting from becoming entangled in or tripping over a long cord. B. Longer extension cords are available and may be used if care is exercised in their use. C.
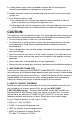
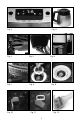
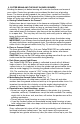
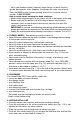
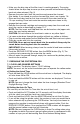
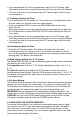
8 Fig. 1 5 6 7 9 1 11 2 12 10 3 13 14 15 4 16 1. GoldTone filter 9. Removable upper burr 2. Filter insert with drip stop 10. Fixed lower burr (not removable) 3. Filter holder 11. Water container lid 4. Carafe 12. Removable water container 5. Digital display (Fig. 2) 13. Steam vent 6. Fineness knob / Upper burr release (Fig. 4) 14. Charcoal filter holder (Fig. 12) 7. Removable bean container 16. Brush 15. Scoop 8.
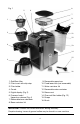
Fig. 2 Fig. 4 Fig. 7 Fig. 10 Fig. 3 Fig. 5 Fig. 6 Fig. 8 Fig. 9 Fig. 11 Fig.
3. COFFEE BEANS AND THE BUILT-IN BURR GRINDER Grinding the beans just before brewing will maximize the flavor and aroma of your coffee. Conical burr grinders are considered the best way of grinding beans. The slower grinding speed of the conical burrs creates less heat thus preserving more aroma of the ground coffee. Following the recommendations below will make your coffee taste better and your machine last longer. a.
- not in your brewed coffee). However, larger stones can block the burr grinder permanently. If this happens, the grinder will make a loud noise. Push the BREW button to stop grinding and call our customer service number: 1-800-767-3554. How to avoid stones entering the bean container: • Shake coffee bag thoroughly, so any stones will fall to the bottom of the bag.
• Make sure the drip stop of the filter insert is working properly. The spring should allow the drip stop to move up when pressed and automatically pop back out when released. (Fig. 5) • Remove the water tank from the machine and remove the charcoal filter holder. If you intend to use the charcoal filter insert, see chapter 7.8. • Rinse out the water tank for first time use and fill the water tank to the 10 cups marking. Place back onto the machine and press down to fully engage the base valve.
• Once desired Auto-On time is programmed, press the AUTO button again. The display reverts to the actual time and the clock icon will remain illuminated. • To turn off the Auto-On feature press the AUTO button again until the clock icon disappears. c) To change the Auto-On Time • Push and hold the AUTO button for 2-3 seconds until the display illuminates with the clock icon and the clock icon starts blinking. • Push and hold the HOUR and then the MINUTES button to set a new Auto-On time.
7.3 POWER INTERRUPTION • If the machine is unplugged or power is interrupted all settings described in chapters 7.1 and 7.2 must be reset. • If the machine was set to Auto-On and power was interrupted, the machine will not brew coffee at the programmed time. 7.4 REMOVING / ATTACHING THE BEAN CONTAINER • Grasp the bean container with two hands and turn the bean container clockwise. • Once the bean container is unlocked, lift straight up off of the machine.
• For first time use, use the coarsest setting. • For dark oily beans use a coarse setting and push the OILY button until the oily bean icon illuminates to select the oily bean function. For light, dry beans use the finer settings. • Open the bean container lid (Fig. 1.8) and fill the bean container (Fig. 1.7) with whole coffee beans. Make sure that the water container lid is closed to prevent beans from spilling into the water container. CAUTION: Check beans for foreign objects (chapter 3e).
• Once fresh filter has been placed in the water tank, hold the "OILY" and "AUTO" button at the same time until the "CLEAN" icon disappears. • The machine will reset and count another 60 pots of coffee. IMPORTANT: Do not use charcoal filter for longer than recommended. Change the charcoal filter as advised for best tasting coffee. 7.9 GOLD TONE FILTER AND FILTER INSERT • Push the filter holder button (Fig. 6). The filter holder swings open. The Goldtone filter and the filter insert can be removed.
• Select the number of cups you would like to brew by pressing the CUPS button. • If using oily coffee beans, press the OILY button. • Push the BREW button (Fig. 2). The cup icon will illuminate and there will be a slight pause before grinding to allow the doors of the bean container and coffee chute to open. • The bean container door will open, then the grinder will start grinding and the ground coffee will push into the GoldTone filter.
9. BREWING COFFEE WITHOUT THE GRINDER You can use your CoffeeTEAM PRO like a regular drip coffee maker with pre-ground coffee (without using the grinder). • Remove the water container (Fig.1.12) and fill to the desired amount of cups. Place water container back onto the machine and push down to fully engage the base valve. • Push the filter holder button to open and fill ground coffee into the GoldTone filter. Close the filter holder. • Insert the carafe with lid into the machine.
10.3 Filter Insert / Drip Stop: Clean the filter insert and the drip stop under running water or in the dishwasher (upper rack, away from any heating element). Test that the drip stop closes completely under running water (Fig. 5). Periodically check that water can flow through the drip stop by filling the filter insert with water and pressing down on the drip stop to check no particles are stuck in the drip stop. 10.
• Use a cloth or paper towel to wipe clean coffee residue from ground coffee chute opening (Fig. 10). • Remove the bean container from the top of the machine. The door to the coffee chute will automatically open for cleaning and maintenance purposes. Make sure the BREW light is off before attempting to open the chute door. • Once the chute door is open, unplug the machine from the wall outlet.
• Place the empty carafe with the lid closed underneath the filter holder with insert and drip stop. • Press GROUND COFFEE button to turn grinder off. Turn the machine on for 2 minutes by pressing BREW. • Turn the machine off and let sit for 15 minutes. • Turn machine on again and let the remaining descaling solution pass through. • Turn the coffee maker off, remove the carafe, empty and rinse a few times with fresh cold water.
How long does the machine keep the grinding and brewing settings? - As long as the machine is plugged in. If the machine loses power you have to reset the time and personal settings (see chapter 7). I want a full pot of coffee at 8:00 AM. What time should I program the machine to start? - Set the Auto-On timer 15 minutes earlier (in this case at 7:45 AM). The grinder makes a loud noise, no coffee is processed. - Ground coffee is blocking the grinder or grinder chute.
Other limitations and exclusions: Any implied warranties including fitness for use and merchantability are limited in duration to the period of the express warranty set forth above and no person is authorized to assume for JURA any other liability in connection with the sale of the machine. JURA expressly disclaims liability for incidental and consequential damages caused by the machine.
JURA Inc. 81 Ruckman Road, Closter, NJ 07624 201-767-3999 • Fax: 201-767-9684 Website: www.capresso.