
Instruction Manual

9
the milk froth. For a stronger taste increase the amount of coee. For a milder taste
increase the amount of milk.
• 1½ to 2 oz. of espresso coee with 3 to 4 oz. of steamed milk (very little or no
milk froth).
• Foamy layer of milk froth on top of hot milk.
• Which kind of milk? Skim milk and 1% milk will produce more milk froth than 2% or
regular milk.
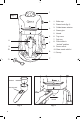
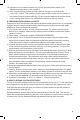
• The markings on the glass carafe help you in the
preparation of brewing and frothing.
Maximum capacity of boiler (approx. 10 oz.). For best results
always ll the boiler with 10 oz. of fresh cold water.
Maximum amount of espresso you should brew (approx. 8 oz.). If you
brew more than 8 oz. the coee will taste burnt. Depending on the coee roast you
might even want to brew a little less to avoid a bitter aroma.
(approx. 4 oz.), guide line for a double shot of espresso.
: Once the coee has reached this level there is enough pressure
in the boiler for steaming and frothing.
Do not leave the machine alone during brewing.
Keep children away during brewing.
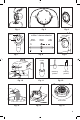
1. Make sure the machine is plugged in and turned o. The glass carafe is removed
from the drip tray. Important: The steam knob (g. 9) must be in the closed position.
The coee/steam selector points to the cup symbol in front of the machine (stronger
coee). Moving the coee/steam selector to the right, accelerates brewing and
decreases coee strength.
2. Fill the basket with ground coee, using the measuring scoop (g.1). The basket is
marked on the inside indicating “2 cups” and “4 cups”. Never overll the basket.
Clear any excess coee from the rim of the lter holder.
it is not necessary to tamp (press down) the coee.
3. Insert the basket into the lter holder (g. 2), then insert the lter holder into the
machine (g. 3).
4. Turn lter holder to the right until it reaches the “locked” position (g.1,8).
5. Fill the glass carafe to the upper rim of the metal band (approx. 10 oz.) with fresh,
cold water.
6. Unscrew the boiler cap (see chapter 5). Using the glass carafe, ll the boiler with
water (g. 4) and close the boiler cap securely (see chapter 5).
7. Place the carafe lid on the carafe so that the opening on the lid points towards the
pouring spout of the carafe (g. 7). Place the carafe on the drip tray as shown in g. 1.
8. Turn the power switch on (g. 6). The power switch illuminates and the machine
starts heating the water.
9. After approx. 2½ to 3 minutes hot water will start forcing its way through the lter
holder into the carafe. When you have enough espresso in the glass carafe turn the
power switch o and turn the coee/steam selector to the steam symbol on the left
to stop the ow. Remove the carafe and serve. Add a bit of sugar and enjoy.
To avoid a “burnt taste” never process all the water through the coee.
Once the brewing noise increases and steam develops, stop the brewing.
10. Important: Do not open the boiler cap. Do not remove the lter holder. First
depressurize the machine. See chapter 3.
11. After de-pressurizing remove the lter holder by turning it to the left to the
“open lock” symbol. Then push the thumb-guard of lter holder over the hot rim of
the basket. Dump the used coee (g. 13) and rinse the basket and the lter holder
under running water. Return the coee/steam selector to the cup symbol.
8. PREPARING CAPPUCCINO and LATTE
Cappuccino and Latte are the most popular espresso-based coee drinks. It is important
that you follow the steps below precisely, otherwise you may not have enough steam
pressure to froth and steam milk properly.
1. Fill a pitcher with 6 to 8 oz. of cold milk and set aside. The pitcher should have at
least a 12 oz. capacity. Make sure the frother points outwards and the black frother
nozzle is in place.
2. Follow steps 1 through 8 in chapter PREPARING ESPRESSO.
3. After approx. 2½ to 3 minutes hot water will start forcing its way through the lter
holder into the carafe. When the espresso coee has reached the bottom marking
of the glass carafe, slide the coee/steam selector to the steam symbol.
4. Immerse the black frother nozzle into the pitcher with the milk so that the lower part
of the nozzle is completely covered in milk (g. 12, frothing position). The tip of the
nozzle should not hit the bottom of the pitcher.
5. With the right hand slowly turn the steam knob towards the steam symbol (g. 9 &10).
Steam will push out into the pitcher. The more you open the steam knob the more
steam will be released. If the steam is too powerful, turn the steam knob back to
reduce the steam output. This procedure might take a little practice (see below).
Once you have injected enough steam into your milk, turn the steam knob back to
stop the steam output completely. Set the pitcher with the frothed milk aside.
Caution: The steam pipe is hot!
6. Move the coee/steam selector back to the cup symbol. Coee will continue brewing
into the carafe.
7. Stand by and turn o the power switch when you have enough espresso in the glass
carafe. Turn the coee/steam selector to the steam symbol on the left to stop the ow.
8. Remove the carafe and pour the espresso into your latte/cappuccino cups. Add sugar
to taste. Add the steamed milk and ladle some of the froth on top. Enjoy.
9. Important: Follow steps 10 and 11 in chapter 7, “Preparing Espresso”.
9. HOW TO STEAM / FROTH EFFECTIVELY.
The tip of the black frothing nozzle has three visible slots on top (g. 11). If the three slots
are immersed into the milk, the steaming action will create froth (for cappuccino). If the
three slots are above the milk level, the frother will inject steam into the milk without or
very little froth (for latte) (g. 12).
Recommendation: Always start with the three slots above the milk level. This way the
steam rst starts heating/steaming the milk. Then immerse the nozzle further into the milk
to create froth. Set the steamed/frothed milk aside so that the froth can settle.