Instruction manual for ceramic hob Model code: C806C Contact Caple on 0844 800 3830 or for spare parts www.4caple.co.
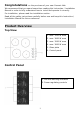
Congratulations on the purchase of your new Ceramic Hob. We recommend that you spend some time reading this Instruction / Installation Manual in order to fully understand how to instal and operate it correctly For installation, please read the installation section. Read all the safety instructions carefully before use and keep this Instruction / Installation Manual for future reference. Product Overview Top View 1. max. 1200 W zone 2. max. 1800 W zone 3. max. 1200 W zone 4. max. 1800 W zone 5.
Product Information This ceramic hob can meet different kinds of cuisine demands because of resistance wire heating, really the optimal choice for modern families. Working Principle This ceramic hob directly employs resistance wire heating, and adjust the output power by the power regulation with the mechanical controls. Before using your New Ceramic Hob • Read this guide, taking special note of the ‘Safety Warnings’ section. • Remove any protective film that may still be on your ceramic hob.
Choosing the right Cookware Do not use cookware with jagged edges or a curved base. Make sure that the base of your pan is smooth, sits flat against the glass, and is the same size as the cooking zone. Always centre your pan on the cooking zone. Always lift pans off the ceramic hob – do not slide, or they may scratch the glass.
Using your Ceramic Hob To start cooking 1. Place a suitable pan on the cooking zone that you wish to use. • Make sure the bottom of the pan and the surface Of the cooking zone are clean and dry. 2. Adjust the power regulating control to the desired level to turn on the control Hot hob warning indicator When the glass plate is hot, the hot hob warning indicator will light. Don’t touch the glass plate until the indicator goes out.
Cooking Guidelines Take care when frying as the oil and fat heat up very quickly, particularly if you’re using PowerBoost. At extremely high termperatures oil and fat will ignite spontaneously and this presents a serious fire risk. Cooking Tips • When food comes to the boil, reduce the temperature setting. • Using a lid will reduce cooking times and save energy by retaining the heat. • Minimise the amount of liquid or fat to reduce cooking times.
1. Choose a compatible flat-based wok or a large frying pan. 2. Have all the ingredients and equipment ready. Stir-frying should be quick. If cooking large quantities, cook the food in several smaller batches. 3. Preheat the pan briefly and add two tablespoons of oil. 4. Cook any meat first, put it aside and keep warm. 5. Stir-fry the vegetables. When they are hot but still crisp, turn the cooking zone to a lower setting, return the meat to the pan and add your sauce. 6.
Hints and Tips Problem Possible causes What to do The hob cannot Be turned on. No power. The glass is being scratched. Rough-edged cookware. Make sure the hob is connected to the power supply and that it is switched on. Check whether there is a power outage in your home or area. If you’ve checked everything and the problem persists, call a qualified technician. Use cookware with flat and smooth bases. See ‘Choosing the right cookware’. Unsuitable, abrasive scourer or cleaning products being used.
Cut out the work surface according to the sizes shown in the drawing. For the purpose of installation and use, a minimum of 5 cm space shall be preserved around the hole. Be sure the thickness of the work surface is at least 30mm. Please select heat-resistant work surface material to avoid larger deformation caused by the heat radiation from the hotplate.
Before locating the fixing brackets The unit should be placed on a stable, smooth surface (use the packaging). Do not apply force onto the controls protruding from the hob. Fix the hob on the work surface by screw four brackets on the bottom of hob (see picture) after installation. A B C D screw bracket Screw hole base Adjust the bracket position to suit for different work surface’s thickness. Cautions 1. The ceramic hob must be installed by qualified personnel or technicians.
6. A steam cleaner is not to be used. Connecting the hob to the mains power supply The power supply should be connected in compliance with the relevant standard,or a single-pole circuit breaker.the method of connection is shown below. 1. If the cable is damaged or needs replacing, this should be done by an after-sales technician using the proper tools, so as to avoid any accidents. 2.
Safety Warnings Your safety is important to us. Please read this information before using your cooktop. Installation Electrical Shock Hazard • • • • • Disconnect the appliance from the mains electricity supply before carrying out any work or maintenance on it. Connection to a good earth wiring system is essential and mandatory. Alterations to the domestic wiring system must only be made by a qualified electrician. Failure to follow this advice may result in electrical shock or death.
must consult with their doctor or implant manufacturer before using this appliance to make sure that their implants will not be affected by the electromagnetic field. • Failure to follow this advice may result in death. Hot Surface Hazard • During use, accessible parts of this appliance will become hot enough to cause burns. • Do not let your body, clothing or any item other than suitable cookware contact the ceramic glass until the surface is cool.
can scratch the glass. • Do not use scourers or any other harsh abrasive cleaning agents to clean your hob , as these can scratch the ceramic glass. • If the power supply cable is damaged, it must only be replaced by a qualified technician.