
Installation Guide
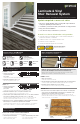

STANDARD / ESTÁNDAR
• The flat non-nosing portion
of Cap A Tread is 8mm
(5/16”) thick
La parte plana sin arista del Cap A Tread tiene un espesor de 8 mm (5/16”)
• Works with tread thickness up to 1-1/8”
Funciona con el peldaño de hasta 1-1/8”
TYPE 2 / TIPO 2
• The flat non-nosing portion
of Cap A Tread is 8mm
(5/16”) thick
La parte plana sin arista del Cap A Tread tiene un espesor de 8 mm (5/16”)
• Works with tread thickness up to 1-5/8” (will not work with 1-3/4”)
Funciona con el peldaño de hasta 1-5/8” (no funcionará con 1-3/4”)
• Tread can either cap the existing tread (for treads 1-1/8” to 1-1/2” thick) or butt flush
to the front of the existing tread face (for treads 1-9/16” to 1-3/4” thick)
El peldaño puede tapar el peldaño existente (de 1-1/8” a 1-1/2” de espesor) o bien estar
adyacente a la parte frontal del peldaño existente (de 1-9/16” a 1-3/4” de espesor)
• Max protrusion is 15/16” overhang. Anything more than that and the riser must be
built out using 1”x 6” boards before Cap A Tread riser is installed
La protuberancia saliente máxima es de 15/16”. Cualquier medida mayor y la contrahuella se
deben construir con tablas de 1”x 6” antes de instalar la contrahuella del Cap A Tread
Visit these links on Youtube for further detailed installations
Visite estos enlaces en Youtube para obtener más instalación detalladas
Laminate & Vinyl
Stair Renewal System
Laminado y vinilo sistema de renovación de escaleras
www.capatread.com
Update carpeted or worn-out stairs
• An easy to install, durable stair covering with a pre-attached
nosing for updating treads and risers
• Coordinate your staircase with your laminate or vinyl purchase
• Easy glue-down installation
• Cost-effective way to add value to your home
Actualice escaleras alfombradas o desgastadas
• Un fácil de instalar, escalera durable cubre con attached husmeando para la
actualización de huellas y contrahuellas
• Cordina tu escalera con tu compra de laminado o vinilo
• Instalación sencilla con pegamento
• Una manera rentable de agregar valor a su vivienda
(LIMITED RESIDENTIAL WARRANTY)
(GARANTÍA RESIDENCIAL LIMITADA)
• Standard Cap A Tread Installation
Instalación estandar de Cap A Tread
https://youtu.be/Us8Ga7_MYUI
• Type 2 Cap A Tread and specific details
Tipo 2 Cap A Tread y detalles especifico
https://youtu.be/90tpUA3nttc
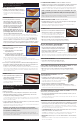
NOTE: The Cap A Tread system should be installed beginning with the bottom-
most riser and alternating the treads and risers from bottom to top.
NOTA: El sistema Cap A Tread deve de ser instalado empesando con la parte de abajo
alternando la piesa de huellas y contrahuellas de abajo para riba.
PREPARE / PREPARAR
1. Gather all of tools listed.
Reúna todas las herramientas indicadas.
2. Start by removing any existing carpet, pad and staples from your existing staircase.
Comience por quitar cualquier alfombra, almohadilla y grapa que exista en su escalera.
3. Vacuum the staircase and make sure it’s free of debris.
Pase la aspiradora en la escalera y asegúrese de que esté libre de escombros.
MEASURE / MEDIR
4. A tread tool can be used to make a template of the tread itself or an angle gauge
can be used on each end with multiple measurements to accommodate for any
irregularities in the step and to ensure a proper tight fit.
Mida cada peldaño (escalón). Asegúrese de medir dos veces y desde ambos lados del
peldaño, ASÍ COMO de utilizar una escuadra o medidor de ángulo dado que es posible que no
sean del mismo tamaño y no sean cuadrados.
Basic Installation Instructions
Instrucciones Básicas de Instalación
Cap A Tread Dimensions
Dimensiones del Cap A Tread
MITER SAW WITH
CARBIDE-TIPPED BLADES
MITRE VIO CON PUNTA DE
CARBURO DE CUCHILLAS
URETHANE-BASED
CONSTRUCTION ADHESIVE
ADHESIVO PARA CONSTRUCCIÓN
A BASE DE URETANO
GLOVES
GUANTES
VACUUM
ASPIRADORA
TAPE MEASURE
CINTA PARA
MEDIR
SAFETY GLASSES
GAFAS DE
SEGURIDAD
Required Tools and Materials
Herramientas y Materiales Requeridos
Installation Links
Enlaces de Instalación