
User Manual


ASSEMBLY
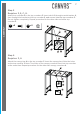
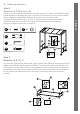
Step 7
Requires
2, 7, B, F, K, L, M.
Place the rear crossbar 7 between the side panels 2. Insert a bolt B through a
metal washer F, through the rear crossbar 7, and secure into the side panel 2.
Do not tighten completely. Repeat procedure for the other side.
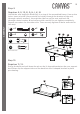
Tighten all bolts from step 1 to step 7 by using the wrenches provided.
Note:The side with “inside” label and “U”shaped brackets should be
towards inside for the rear crossbar 7.
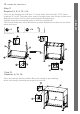
Step 8
Requires
8, 9, 10, 11.
Lay out the right arm 9, left arm 8, front support bar 10 and rear support bar 11.
Make sure that the labels marked “FRONT’’ on the arms and support bars are
all facing the front edge of the seat. Attach the seat support bars to the arms
by pressing the tabs on the ends of the front support bar 10 and rear support
bar 11, down into the brackets on the arms. Make sure they are securely
seated.
8
MODEL NO. 088-1934-4
B
F
x 4
x 4
FRONT
inside
9
10
11
9
11
11
10
9
8
Not actual size.
K
L
M
7
B
F
7
2
2
2
inside