
Software Starter Guide (For the Canon Digital Camera Solution Disk Version 27)


Wireless Network Settings for the Computer and Camera
84
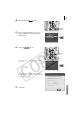
12 After confirming the displayed settings, click
[Print] to print out the configuration
contents.
This information will be necessary if you cannot
make a connection or later change the settings.
Store this information in a secure place because it
is important information about your computer.
13 After the printing finishes, click [Next].
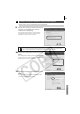
14 Click [Finish].
15 When [Registration completed] appears on
the LCD monitor, press the F
FUNC./SET
button.
This registers the network configuration on the
camera.
16 Press the camera's M
MENU
button.
The camera will return to the playback mode.
17 Turn off the camera.
The Camera Control Window on the computer screen will close.
18 Detach the interface cable and connect wirelessly.
Please use the procedures in Connecting to test the correction operation of the wireless
connection (p. 85).
If the "Insufficient space in camera" message appears, delete target devices that are
not needed and proceed to the next step.
• If a message concerning settings
appears, follow the instructions on
the screen and change settings. For
details on how to change settings,
refer to the computer's user guide.
• If you set up an IP address, be sure
to use a different address than the
one that was displayed during step
12.