Model 1502 Domain Management Module User Manual
EdgeAccess Universal Chassis System NOTICE Canoga Perkins has prepared this users manual for use by customers and Canoga Perkins personnel as a guide for the proper installation, operation and/or maintenance of Canoga Perkins equipment. The drawings, specifications and information contained in this document are the property of Canoga Perkins and any unauthorized use or disclosure of such drawings, specifications and information is prohibited.
EdgeAccess Universal Chassis System Table of Contents Chapter 1 Overview and Management Architecture ............................................1-1 Features of the Domain Management Module ....................................................................................1-2 DMM Management and SBMC ..........................................................................................................1-3 Security...........................................................................................
EdgeAccess Universal Chassis System Index ......................................................................................................................... I-1 List of Figures Figure 1. UCS 1002 Chassis .............................................................................................................. 1-1 Figure 2. The Domain Management Module..................................................................................... 1-2 Figure 3.
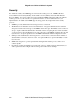
EdgeAccess Universal Chassis System Chapter 1 Overview and Management Architecture The Model 1502 Domain Management Module (DMM) provides Universal Chassis System (UCS) management with commands and controls in the 2U size that fits the UCS 1002. See Figure 1. It provides multiple levels of fault-tolerant manageability and supports industry-standard methods to access the module. Figure 1.
EdgeAccess Universal Chassis System Features of the Domain Management Module The DMM, shown in Figure 2, provides these features and functions: • • • • • • • • • • • Command and control up to eight UCS chassis from a single IP address Manage up to 224 chassis-based and 224 remote standalone units for up to 448 modules per domain Manage and configure devices within this chassis through the High-level Data-Link Control (HDLC) protocol, using the domain, virtual group, chassis, and module hierarchy Manage an
EdgeAccess Universal Chassis System DMM Management and SBMC Depending on the number and organization of modules and chassis, DMM management can include these four levels: • • • • Domain: One to eight chassis logically linked in a single management environment; the top level of DMM management Virtual Group: A logical set of two to 128 of the same type of module that can be in different chassis or remote linked partners, but all within the domain; the DMM supports up to 32 Virtual Groups Chassis: An enclos
EdgeAccess Universal Chassis System Security For enhanced security, the DMM supports four network security protocols: SNMPv3, Remote Access Dial In User Security (Radius), Secure Shell version 2 (SSH-2) and Secure File Transfer Protocol (SFTP). You can set values and options within the DMM software that will work with the security protocols on your network; for specific information, see the documentation for your implementation.
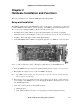
EdgeAccess Universal Chassis System Chapter 2 Hardware Installation and Functions This section describes how to install the DMM in the UCS Model 1002. Setup and Installation The DMM is installed in the UCS 1002 Chassis in slot 1 at the factory. Occasionally, you may need to install a DMM in a UCS 1002, if ordered separately. The DMM can be installed anywhere from slot 1 to slot 14. To install the DMM, see Figure 3 and follow these steps: 1.
EdgeAccess Universal Chassis System Front Panel Functions The DMM front panel includes these features (see Figure 2): • • • Four Status LEDs; Table 1 lists the LEDs and their meanings Two interface ports for serial and 10BASE-T access Two switches: Reset (reboots the DMM) and MDM/TRM Table 1.
EdgeAccess Universal Chassis System Chapter 3 Software Management Through VT100 You can manage the system with VT100 Terminal Emulation through the Command Port on the DMM, which is accessible by a Telnet session, HyperTerminal or similar terminal emulation software; a standard SNMP network manager; and CanogaView. For details on CanogaView, see the CanogaView User Manual.
EdgeAccess Universal Chassis System 4. When the main Windows screen (desktop) appears, click Start, highlight Programs, Accessories, the HyperTerminal Folder, and click HyperTerminal. 5. At the Connection Description dialog, select an icon, enter a name for the connection to the system, and click OK. 6. At the Connect To dialog, pull down the Connect using menu, select the COM port, and click OK. 7.
EdgeAccess Universal Chassis System General Screen Format A typical screen, shown in Figure 4, includes standard descriptions and reference designations. Use this and other screens to configure the system, set operational parameters, and verify the system status. All screens use a common method for navigation. Chassis and slot information Model number Status reports Screen navigation instructions Change options Messages and urgent status Figure 4.
EdgeAccess Universal Chassis System User Interface Organization The user interface consists of selectable, nested menus and screens, available in this order: Main Menu 1. Domain Management Module 1. System Configuration 2. Change Security & Passwords 1. Security Configuration 2. User Accounts 1. or 3. Edit User Account 3. Radius Client Configuration 3. PING Menu (Ping Generation) 4. Software Upgrade 5. Trap Configuration 6. Host Access Table 1. or 3. Edit Host Access 7.
EdgeAccess Universal Chassis System Login and DMM Main Menu When you connect to the DMM through HyperTerminal or Telnet, the first screen is the DMM Login Menu. To log in, follow these steps: 1. If this is your initial setup and no username or password has been set, type admin and press at the prompt for the username. Otherwise, type your username and press . 2. At the prompt to enter your password, enter the password if one has been set; otherwise, type admin and press .
EdgeAccess Universal Chassis System Table 3. Domain Management Module Menu Selections Menu Item Description 1. System Configuration Set values for the system information and communications parameters 2. Change Security & Passwords Set up system security and access 3. Ping Generation Send a PING from the DMM to a specific IP address 4. Software Upgrade Download and install new firmware 5. Trap Configuration Set the DMM conditions that generate SNMP traps 6.
EdgeAccess Universal Chassis System Table 5. System Configuration Options Menu Item 1. System Contact 2. System Name 3. System Location Description Optional information, up to 50 characters 4. Default SNMPv1/v2c Password for SNMP Read access, up to 14 characters, default is Read Community "public" 5. Default SNMPv1/v2c Password for SNMP Write access, up to 14 characters, default is Write Community "private" 6.
EdgeAccess Universal Chassis System The MAC or Ethernet hardware address for the DMM is fixed. If BOOTP is enabled during the initialization process, it broadcasts BOOTP request packets until it receives a response from the BOOTP server or you press to continue. If the DMM has a fixed IP address, disable BOOTP. To assign an IP address to the DMM through the BOOTP request process, follow these steps: 1. At the Domain Management Module menu, type 1; the System Configuration screen appears. 2.
EdgeAccess Universal Chassis System Manage the Date and Time An accurate date and time in the DMM assures accuracy for events listed in the System Log and for traps and alarms sent to the system administrator, as well as for all events listed in event logs for individual modules within the system. The date and time for the DMM overrides any date and time set in another module in the domain.
EdgeAccess Universal Chassis System 3. To return to the Domain Management Module menu, press . Note: Because the Clock circuit exerts a large power drain on the lithium battery in the DMM, the Clock may lose time when the power is off or the DMM is out of the chassis. Reset the date and time whenever you install the DMM in the chassis or turn the power on.
EdgeAccess Universal Chassis System A faulty connection can appear similar to this with one or more requests timed out: Reply from 216.109.112.135 Seq #4 time <70 ms TTL=47 Request timed out Request timed out Reply from 216.109.112.135 Seq #12 time <70 ms TTL=47 Reply from 216.109.112.135 Seq #13 time <70 ms TTL=48 14 packets transmitted, 10 packets received, %28.571 packet loss round-trip min/avg/max < 70.000/71.000/80.000 ms Press ESC to continue. 5.
EdgeAccess Universal Chassis System 3. Download the new firmware from the Canoga Perkins web site to your TFTP server; put the firmware in the "/BURNING" directory. For FTP, enable binary transfer mode. When the transfer is complete, the file is moved automatically to the "/INACTIVE" directory if it is DMM firmware, or to the "/MODULES" directory if it is firmware for another module. 4. Go to the System Configuration menu and enter the IP address, subnet Mask, and default gateway for the DMM. 5.
EdgeAccess Universal Chassis System Set General Security Parameters General security parameters include values for passwords, lockout, and logout, which are basic to maintaining security regardless of which security application runs on your network. To set values for general parameters, access the Security Configuration screen and follow these steps: 1. At the Domain Management Module menu, type 2, "Change Security & Passwords," and press . The Change Security & Passwords menu appears. 2.
EdgeAccess Universal Chassis System Set Up and Manage a User Account You can set up an account for a user, whether another supervisor, operator, or observer, to access the DMM. You can also update or delete usernames or permissions. To manage a user account, access the User Accounts screen and follow these steps: 1. At the Domain Management Module menu, type 2, "Change Security & Passwords," and press . The Change Security & Passwords menu appears. 2.
EdgeAccess Universal Chassis System 4. To delete a user, type 2, then follow the prompts to select the user name and confirm the choice; the User Accounts Configuration screen reappears. 5. To return to the Change Security & Passwords menu, press . Set Up Host Access The SNMP agent allows access to up to 24 Host IP addresses listed in the Host Access Table. Set up the Host and network information for access to the DMM on the Host Access Table screen.
EdgeAccess Universal Chassis System Set Up a Radius Client Before you can set up the DMM as a Radius Client, you must set related attributes on the Radius server to predefined values in order to properly authenticate and configure the user. The DMM uses four vendor-specific attributes, type 25 in the Radius RFC; the Canoga Perkins vendor identifier is 919.
EdgeAccess Universal Chassis System Change Your Password Whether you have supervisor, operator, or observer access, you can update your password for the domain in order to maintain system security. You cannot change the password for any other users. To access the Change Password screen, follow these steps: 1. From the Main Menu, type 10, "Change Password," and press . 2. To change your password, follow the prompts on the screen. 3. To return to the Main Menu, press .
EdgeAccess Universal Chassis System 5. To finish setting up SNMPv3-Inform notification, either type a value and press or press to cycle through the options for these parameters: • • • • • • • • • • • Security Name: Enter the name of the user account at the destination, up to 10 characters Engine ID: Enter the SNMP Engine ID at the destination; view it at the destination configuration; 64 Hex characters.
EdgeAccess Universal Chassis System View Events in the System Log You can use the information on the log and status screens for maintaining the system or troubleshooting a fault. In addition to external notification of traps, the System Log screen lists events generated by the DMM and managed modules within the domain, including traps. For a typical System Log, see Figure 5. The events appear in chronological order with the most recent event at the top of the list.
EdgeAccess Universal Chassis System Manage System Status and Alarms If an alarm occurs, it sets the Alarm Relays on the CIM for the chassis with the module with the problem. The System Status screen shows general alarm and error information about the system, such as which chassis has an alarm, as well as hardware and software data for the DMM, and provides an option to reset all alarms relays in the system.
EdgeAccess Universal Chassis System 2. To force a session off, type the number for that session and press . Note: Although a user with any level of access can view the information, a user must have supervisor access to force a session off. 3. To return to the Main Menu, press . Create and Manage Virtual Groups You can set up a Virtual Group to upgrade software or swap memory banks on two or more modules of the same type at the same time; the DMM can support up to 32 Virtual Groups.
EdgeAccess Universal Chassis System 4. At the Virtual Group Management screen, make any of these selections: • To add a module to a Virtual Group, type 1, then at the prompt, enter the Chassis and Slot for the module, and press . • To delete a module from the selected Virtual Group, type 2, then at the prompt, enter the Chassis and Slot for the module, and press . Note The delete option in the Virtual Group Management menu deletes an entire Virtual Group.
EdgeAccess Universal Chassis System CHASSIS MANAGEMENT Chassis:2 LOCAL Slot Status Module Type 1 OK 1502-DMM 2 OK L311-LAN 3 OK L321-LAN 4 OK L321-LAN 5 OK L322-LAN 6 OK 2346-Modem 7 OK 2446-Modem 8 OK L322-LAN 9 OK L342-Modem 10 OK L312-LAN 11 OK L322-LAN 12 OK L332-LAN REMOTE Status Module Type N/A OK L311-LAN OK L321-LAN OK L321-LAN N/A OK 2346-Modem OK 2446-Modem N/A N/A N/A N/A N/A Name Redundancy DMM None 10Base-Tx None 100Base-Tx None Single Fiber None Single Fiber N/A DS3 Modem None E3 Modem N/A D
EdgeAccess Universal Chassis System Manage a CIM The CIMs can interconnect up to eight chassis in one domain. Use the CIM Management screen to view real time and static information about the chassis. Each CIM monitors a variety of operational parameters for the chassis that it is in, including: • • • • Chassis type Power supply status and chassis temperature Clock status Major and Minor alarms status To access the CIM Management screen, follow these steps: 1.
EdgeAccess Universal Chassis System Manage a Module If you know which chassis and slot a specific module is installed in, you can directly access and manage it through the Module Menu. For details about a specific module, see the User Manual for that module. Note: You can manage most features of a module by opening the chassis management screen, then selecting the module in the chassis; however, you cannot name a module through that path.
EdgeAccess Universal Chassis System 3-26 Model 1502 Domain Management Module
EdgeAccess Universal Chassis System Chapter 4 Specifications Physical Specifications Dimensions 3.0"H x 1.0"W x 9.0"D (76.2 mm x 25.4 mm x 228.6 mm) Weight 0.3 lb (0.1 kg) Environment 0° to 50° C Up to 95% Humidity (non-condensing) Power +5.
EdgeAccess Universal Chassis System 4-2 Model 1502 Domain Management Module
EdgeAccess Universal Chassis System Appendix A Warranty Information Current Warranty information is available on-line in the Client Login Area of the Canoga Perkins web site (www.canoga.com) or by contacting Technical Support at 800-360-6642 (voice) or fiber@canoga.com (email).
EdgeAccess Universal Chassis System Index A E add edit host access, 3-15 host access, 3-15 trap destination, 3-17 trap destination, 3-17 user account, 3-14 user account, 3-14 virtual group, 3-21 virtual group, 3-22 alarms Edit Host Access screen, 3-15 CIM Management screen, 3-24 EIA interface pinout, 4-1 reset, 3-20 F view, 3-19 firmware download C FTP or SFTP, 3-11 Change Password screen, 3-17 IP address, 3-12 Change Security & Passwords menu, 3-13 firmware revision by module, 3-2
EdgeAccess Universal Chassis System M S MAC address, 3-8 SBMC, 1-3 menu screen Change Security & Passwords, 3-13 Change Password, 3-17 DMM Main Menu, 3-5 Change Security & Passwords menu, 3-13 Domain Management Module, 3-5 Chassis Management, 3-22 Module, 3-25 CIM Management, 3-24 System Configuration, 3-6 Code Library menu, 3-20 Virtual Group Management, 3-21 Connected Sessions, 3-20 mibs, required, 3-1 DMM Main Menu, 3-5 Modem/SLIP/PPP menu, 3-10 Domain Management Module menu, 3-5 m
EdgeAccess Universal Chassis System sideband management channel, 1-3 system date and time, 3-9 SIMM card functions, 1-2 System Log screen, 3-19 SNMP, 3-15 System Status screen, 3-20 for traps, 3-17 T v3 parameters, 3-18 SNTP Configuration screen, 3-9 SNTP date and time, 3-9 Software Upgrade screen, 3-11 software version, 3-11 time and date, 3-9 Trap Configuration screen, 3-8 Trap Notification/Destination Table screen, 3-17 troubleshooting and PING, 3-10 status LEDs, 2-2 U switch user interface
CANOGA PERKINS CORPORATION 20600 Prairie Street Chatsworth, California 91311-6008 USA Phone: (818) 718-6300 FAX: (818) 718-6312 Web Site: www.canoga.com Email: fiber@canoga.