
Programming instructions


52
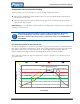
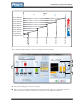
C This is where you select the actuator stage you want to program.
D These are the settings for the selected actuator and stage. The diagram corresponds to the
settings. The blue line represents the actuator settings. The red line represents the ambient
temperature.
To adjust a setting, click and drag its slider up or down.
To adjust a setting by 0.1-degree or 1 percent increments, click the slider and then press UP
or DOWN on your keyboard.
To adjust a setting by 1.0-degree or 10 percent increments, click the slider and then press
PGUP or PGDOWN on your keyboard.
After the room is properly set up and balanced, you should not need to change
the actuator settings. Changing the settings after the room is set up can affect
the ventilation balance in the room. If you need to change settings after the room
is set up, you should change the Power Block settings. For more information,
read Programming Power Block settings on page 31.
If the Power Block is in empty room mode, only the inlet position is available.
Inlets maintain the programmed position.
Use the Actuator settings worksheet on page 85 when programming actuators.
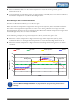
To program actuators
1. In the main window, click Settings, and then Ventilation.
2. Below Your Power Blocks, select the Power Block you want to program and then click Edit
settings.
The Ventilation settings window displays.
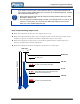
3. Below Equipment settings, click the actuator you want to adjust.
The window displays the settings for the minimum stage of the selected actuator.
4. Below Stage, select the actuator stage you want to program.
5. Adjust the settings. The diagram changes as you adjust the settings.
To adjust a setting, click and drag its slider up or down (left or right for the stage position).
To adjust by 0.1-degree or 1 percent increments, click the slider and then press UP or
DOWN on your keyboard.
6. Repeat steps 4 and 5 for each actuator stage you want to program.
7. Click OK to save the changes and return to the Settings window.