
Instruction manual


SECTION 6. RTM (REAL TIME MONTIOR)
6-4
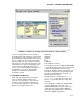
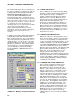
The Station.Table.Field can be selected from a
list of those available (see Figure 6-2). This list
is displayed by double-clicking in the FIELD
IDENTIFIER OR EXPRESSION box or by
selecting the DATA TABLE DEF'S button.
Selecting a station, table, or field from the list,
inserts that definition (as if it had been typed in)
at the cursor in the expression box. It does not
remove previous selections or entries. Be sure
to completely erase the old expression if
entering a new one. The expression box allows
cursor movement and editing. If the
Station.Table.Field elements are entered
manually be sure the case matches that given
in the lists as these elements are case
sensitive.
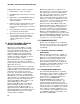
In addition to the Station.Table.Field definitions,
a display may require high-low limits, alarm
limits or other parameters. Accessory displays
may require parameter regarding units, size, or
similar questions. Use the mouse or the TAB
and SHIFT-TAB keys to move the cursor from
parameter to parameter. When finished filling
out the parameters, select the OK buttons to
close the dialog box and show the display.
Pressing CANCEL or DELETE will remove a
new display.
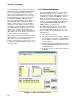
FIGURE 6-3. Multipen Strip Chart Definition
6.1.7 SIZING THE DISPLAY
Once a display has been placed, and the dialog
definitions complete the final display will appear.
Some displays are sizable. If a display is
sizable, a sizing border will appear around the
display when it is selected. When the mouse
pointer is placed on this border, it will change to
double headed arrow indicating the axis
(horizontal or vertical) in which the display can
be sized. Click and hold the left mouse button
while moving the mouse (dragging) in indicated
direction to increase or decrease the size of the
display along that axis. Dragging on a corner of
the sizing border allows the display to be sized
along both axes at once.
6.1.8 EDITING EXISTING DISPLAYS
While in the edit mode, existing displays can be
sized, moved, edited, or deleted. The techniques
to move or size the display are explained in the
sections on placing and sizing the display. To edit
a display's definition, select the display and then
select EDIT PARAMETERS from the COMMANDS
sub menu or double click the left mouse button
with the pointer on the display. The dialog box will
appear and the parameters can be edited (see
Figure 6-3). Press the OK button to use the
changes and show the display. Press the
CANCEL button to disregard the changes and use
the previous definition. Press the DELETE button
to remove the display completely. Deleting an
existing display will display a window asking for
confirmation of the deletion.
6.1.9 LOADING AND SAVING TEMPLATES.
Once created, a template should be saved.
This allows the template to be used again
without having to place and define all of the
displays. If the computer loses power (power
failure), is turned off, or is rebooted the current
template will be lost if it has not been saved.
Select the FILE option from the main menu and
a menu of file options including those to LOAD
and SAVE template will be shown. Selecting
SAVE allows a new template to be named and
saved, or an existing template to be saved with
the same name. The SAVE AS option allows a
template to be saved with a new name. The
LOAD option allows a different template to be
loaded. Loading a different template will erase
the current template if it is not saved first. The
NEW option clears the current template so a
new template can be started. The current
template will be lost if not saved before NEW is
selected.