
Instruction manual


SECTION 5. NETADMIN
5-9
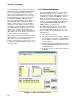
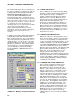
When all stations that need to have programs
downloaded are in the queue, select the START
button. The programs will be downloaded one
at a time. When a download is complete it will
be listed in the .DLD PROGRAM STATUS box
at the top of the window. This will replace any
earlier message regarding the station. A station
and “.DLD” file combination can be removed
from the queue by highlighting it and selecting
the DELETE button. The status line on the
bottom of the window will give information on
the current download. Once the start button
has be selected, the DLD PROGRAM
DOWNLOAD window can be closed at any
time. The downloads will continue as long as
NetAdmin is left running. A message indicating
successful download (including program
signature) will be displayed in the STATUS
WARNING FAULT message window.
NetAdmin will attempt to download each
program file until it is successful or the user
cancels that particular operation. If a site
cannot have a program downloaded (e.g., does
not respond), the other downloads following it in
the queue will not be attempted until the
download being attempted succeeds or is
canceled.
5.5 STATUS/WARNING/FAULT
MESSAGES
Messages relating to the computer, communi-
cations, and the dataloggers can be viewed and
stored to disk. Messages are classified as a
status, warning, or fault. Status messages give
information about clock sets, program
downloads, and datalogger data being
collected. Warning messages indicate that a
potential problem occurred or that something
unexpected happened. For example, a
communication retry occurred. Fault messages
indicate that an operation failed. Most
operations are retried after a fault.
Select STATUS/WARNING/FAULT from the
VIEW menu to display a list of these messages.
Clicking on any message or on the scroll bars
on the right side of the window will pause the
display of new messages at the end of the list.
To resume the display, select the VIEW END
OF LIST button on the bottom of the screen.
When this button is checked, the newest
messages will be displayed as they arrive.
The SETUP... button displays the setup window
when selected. The setup window allows the
selection of what messages are displayed.
Selections include which type of message
(status, warning, faults), which stations the
messages are about, and which stations the
messages are from. When the OK button is
selected, the display window is updated to
reflect current choices. NetAdmin buffers the
last 100 messages of each type regardless of
the setup selections, so it is possible to change
the selections and see a different display of the
same group of messages.
The messages logged to disk are also filtered by
the setup selections. The selections that are
current when the message arrives determine
whether the message is written to disk or not.
When logging messages to disk, they are written
to a file named SWF$.log (see Section 8.1).
5.6 RF LINK TEST
Before adding RF stations to the net description
or when checking existing stations, it is
desirable to test the radio communication path
to a site. Found on the NetAdmin VIEW menu,
this option allows low level testing of radio links.
Stations and repeater only sites can be tested.
Stations being tested do not have to be entered
into the NetAdmin description but the RF BASE
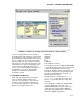
station does. To perform a test, select the
RFBASE station from the list of stations
displayed under the caption "RFBASE
STATION". Enter the address of the remote
RF95T to test in the [REPEATER] SWITCH
SETTING: box. To test a link using repeaters,
enter the repeater address or addresses
followed by the remote address. Separate
addresses with a space. Select the BEGIN
button to start the test. The results will be
displayed in the TEST STATUS/RESULTS
window at the bottom. A row of five numbers
will be returned for each RF95T in the test,
including the RF BASE. The first number in
each row indicates the size of the packet and
should be around 238, depending on the link
tested. If it is about one half that size or
smaller, then there is probably outside
interference on the frequency in use. The next
four numbers indicate the quality of the link and
should be around 80 to 125 (see Section 8.4).
Poor numbers here can indicate antenna, power
problems, or bad communication path. The
rows of numbers start at the remote and work
back to the RFBASE. Results are also written to
a file (see Section 8.1).