
Manual


PWC100 Present Weather Sensor Calibrator
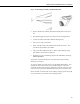
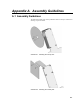
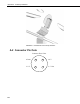
Step 4: Position 2: Left
• Move the calibrator into the left hand position by unscrewing the calibrator
mounting screws slightly and sliding the calibrator fully to the left. Then
retighten the screws once in position.
• Visually check that the calibrator is located correctly and securely.
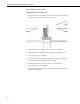
• LED L should now be flashing slowly and all other LEDs should be off.
• Once you are ready, press START.
• The test is now automated and the disk should start rotating. LED L will
stay illuminated until this stage of the test is complete.
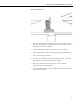
• Wait for the calibration disk to stop rotating. This test will take
approximately two and a half minutes.
• Upon successful completion of the test, LED R will be flashing slowly and
LED L will be turned off.
7