
Owner's manual

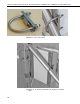
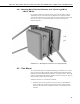
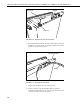


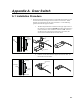
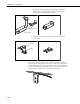
Table Of Contents
- Revision and Copyright Information
- Warranty
- Assistance
- Table of Contents
- 1. General Description
- 2. Enclosure Supply Kit
- 3. Mounting Equipment Inside the Enclosure
- 4. Attachment to an Instrument Mount
- 5. When to Replace Desiccant
- 6. Resistance to Weathering
- Appendix A. Door Switch
- Appendix B. 25458/28532 DIN-Rail Terminal Kits
- Appendix C. 28960 Stack Mounting Kit
- Appendix D. Keeping Insects Out Of the Enclosure
- Campbell Scientific Companies

Appendix A. Door Switch
c. The bracket used for mounting the sensor magnet in the door
depends on the depth of the door. If the door face is flat, the
sensor magnet is mounted as shown below.
Large Bracket
Sensor
Large Bracket Insert
d. If the door face is extended, the sensor magnet is mounted as
shown below.
Small Bracket
Magnet
2. Using the brackets determined in step 1, assemble the sensor and place it
in the upper right corner of the enclosure case. Align the top of the sensor
with the inside edge of the sensor case as shown. Do not allow the sensor
to extend beyond the edge of the enclosure case. Using a marker, mark the
locations for two mounting holes to secure the sensor bracket.
A-2