
Use and Care Manual

Operating Instructions
3
PUMP LUBRICATION
All moving parts must be guarded. All
electrical covers must installed before
turning on the power.
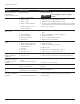
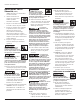
Before operating
compressor, fill
to the center of the sight gauge (see
Figure 3).
Using any other type
of oil may shorten
pump life and damage valves.
Recommended Oil
• Use full synthetic, non-detergent
air compressor oil.
Fill the pump with oil to the center of
the sight gauge using oil fill opening
(see Figure 3). Do NOT fill the pump
through the breather cap opening
as this may cause oil to leak and
spray out during operation.
STARTER SOLENOID (UNIT
WITH ELECTRIC START ONLY)
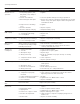
1. Disconnect negative cable from
battery terminal before attaching
wires to the solenoid.
2. Remove the 1/4”nut from the left
stud. Do not make contact with the
right stud to avoid possible engine
ignition.
3. Attach the positive (red) battery
cable to the left stud and reinstall
the 1/4” nut. Tighten the nut one
full turn after it is finger tight (See
Figure 2).
4. Attach the negative (black) battery
cable to a convenient ground. The
best place is at the engine mounting
bolt. Other secure places on the
engine are suitable.
5. Reattach the negative cable to the
battery.
Failure to install
appropriate water/
oil removal equipment may result in
damage to machinery or workpiece.
ENGINE LUBRICATION
This unit is shipped without oil. Before
operating, oil must be added. See
the engine manual for recommended
engine lubrication.
Operation
All lubricated compressor pumps
discharge some condensed water
and oil with the compressed air.
Install appropriate water/oil removal
equipment and controls as necessary
for the intended application.
Installation (Continued)
attached equipment. Never use the
wood shipping skids for mounting the
compressor.
The compressor should be installed on
a level floor or foundation of sufficient
strength and rigidity to support it
without vibrating. It is recommended
to use shims under the mounting feet
to level the compressor, to prevent
“rocking” and excessive vibration. To
reduce vibration, isolator pads are
recommended. When isolators are used,
install a flexible coupling between
the tank and any pipe permanently
attached to the tank.
When permanently
installing compressor for stationary
use or mobile use such as on a truck,
avoid overstressing a mounting foot by
“pulling the foot down” to the floor.
This may cause eventual failure.
Install and operate unit at least 24”
from any obstructions in a clean,
well ventilated area. This will ensure
an unobstructed flow of air to cool
the compressor and allow adequate
space for maintenance. Never operate
compressor in a small, closed room.
Vent the engine exhaust to outside.
Do not locate the
compressor air inlet
near steam, paint spray, sandblast areas
or any other source of contamination.
Assembly
TANK
(OUTLET VALVE SOLD SEPARATELY ON
ALL MODELS)
Assemble the outlet valve to the pipe
nipple. Install assembled valve in either
end of the tank.
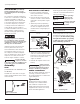
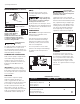
Figure 1 - Outlet valve
Fuel Tank
Attach
positive (+)
cable to
left stud
Figure 2 - Starter Solenoid
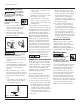
Figure 3 - Oil Fill Diagram
Breather
Cap
Oil Fill
Plug
Oil Drain Plug
Sight Gauge
Low
Full
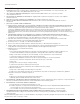
Breather
Cap
Low
Full
Oil Fill
Plug
Oil
Drain
Plug
Sight
Gauge
Figure 3 - Oil Fill Diagram