
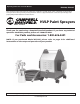
Operating instructions


10
Operating Instructions and Parts Manual
HVLP Paint Sprayers
using a cross pattern, rotating an
even amount of pressure on each
one until each is tight and secure.
4. Plug the power cord into a proper
grounded receptacle outlet.
If you are using an
NOTICE
extension cord, it is
imperative to use at
least a 12 gauge cord to avoid damage
to electrical components.
SETTING POT PRESSURE AND
PRIMING SPRAY GUN
5. Turn on the mini-compressor unit.
Locate the on/off switch, which is
mounted on top of the silver box
on the compressor located at the
back of the cart. Move the switch to
the “ON” position. You should hear
the compressor activate.
6. Look at the pressure gauge located
on top of the pressure pot lid. You
will notice the gauge begin to rise.
Attached to the pressure gauge is
the pressure regulator. The pressure
gauge will tell you how much
pressure is in the pressure pot.
Generally you will only need about
5 psi for most light to medium
viscosity fluids. Increasing pressure
should only be necessary for high
viscosity fluids.
7. If the pressure rises above the
desired maximum, you can release
pressure in the pot with the air
release valve and control the
maximum amount of pressure with
the pressure regulator.
8. To decrease pressure, rotate the
knob on the pressure regulator
counterclockwise. To increase
pressure rotate the knob clockwise.
Stop when the desired pressure is
achieved.
9. Your compressor is set to shut off
when the desired pressure is
reached and back on when the
pressure drops down. This has been
www.chpower.com
HV2100, HV2105
preset at the factory and should not
be readjusted.
Additional
Instructions for Model
HV2105 (3F485)
(Cont.)
NOTE: The following action should be
done without the turbine running.
10. When your desired pot pressure has
been set, pull the spray gun trigger
back. The first time you are using
the pressure pot each day, or after
the pressure pot has been
depressurized, it will take about a
minute for the material to flow
through the fluid hose to the spray
gun (priming the spray gun).
11. Hold the spray gun safely away
from you. When the material
reaches the tip of the spray gun, a
stream of fluid will flow out.
12. Watch the fluid stream. It should
extend out 2-1/2” (6.35 cm) before
the stream begins to bend. If it
extends out more than this, then
you have too much pressure. If it is
too little, then you need more
pressure. Adjust accordingly.
13. Once this is adjusted, locate the
black ring on the pressure regulator
and screw it back into the pressure
regulator knob. This will lock the
regulator settings in place.
14. Turn on the turbine system. You
should now be able to spray
continuous volume from the
pressure pot.
NOTE: Never open the pressure pot
without turning off the air compressor
and releasing the air pressure in the
pot with the air pressure release valve.
(Open valve until all pressure is
released. Pressure gauge will read “0
psi” when there is no more pressure in
the pot).
CLEANING THE SYSTEM
1. When you are finished spraying for
the day, it is wise to clean your
spray gun, the pressure pot and the
fluid line. While it is possible to
leave fluid in the pressure pot
between uses, be sure that all
materials are compatible with the
components of the pressure pot to
avoid fluid contamination. Never
leave catalyzed or epoxy materials
in the pot beyond suggested pot
life of the fluid product to avoid set
up and hardening of the coating
and damage to the pot, its
components, fluid lines and the
spray gun.
2. Release all air pressure in the pot.
Locate the air release valve and
turn counterclockwise.
3. You will hear a “hissing” sound.
The pressure in the pot is now
releasing. You will also notice that
pressure gauge will lower to “0
psi”. Once there is no more pressure
in the pot, it is safe to open.
4. Follow normal cleaning procedures
of the spray gun as outlined in the
Maintenance section and in the
information supplied with the spray
gun.
5. Clean pressure pot and fluid lines
with appropriate cleaning materials
for the product being sprayed. Use
caution and follow all safety
guidelines specirfied by the product
manufacturer.
6.. Spray cleaning fluid from the
pressure pot through the fluid line
and the spray gun until you are
satisfied that all paint or coating
material has been flushed through
the system.
Store equipment for future application.