Cameo D4 English
Cameo D4 Table of contents 1.Quick Start ........................................................................................................................................... 1 1.1.Installing the Software ............................................................................................................ 1 1.2.Adding Lighting Fixtures ........................................................................................................ 3 1.3.Programming a Scene .............................
Cameo D4 / Quick Start 1.Quick Start 1.1.Installing the Software Downloading Thanks for checking out Cameo D4. The quick start topics contain all the information you need to start using the software in less than 1 hour. The manual then proceeds to explain the functionality in depth. The full software version can be downloaded from our website. Minimum computer requirements: Computer working under Windows 7 or higher, or MAC OSx 10.
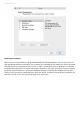
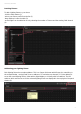
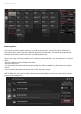
Cameo D4 / Quick Start Starting the software When Cameo D4 is launched, you will be presented with the following window. Here we see a list of all DMX and Art-Net devices connected to your computer or local network. The window can also be accessed from the Cameo D4->Preferences menu on Mac, or Edit -> Preferences menu on Windows. If no devices are listed, this means that your device has not been detected.
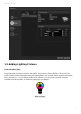
Cameo D4 / Quick Start 1.2.Adding Lighting Fixtures Fixture Profiles (SSL) Every light used in Cameo D4 has its own profile. This is called a Fixture Profile or SSL profile. The profile contains all the information about the lighting fixture (for example, which channel controls the Color, Dimmer etc...). If your fixture profile is not available, you can create it yourself using the included Scan Library editor, or request a profile from our website.
Cameo D4 / Quick Start Patching fixtures To add a lighting fixture to your show: -click the Patch button (1) -select your fixture profile from the list (2) -drag and drop it onto the table (3) -several lights can be added at once by selecting the number of fixtures and the starting DMX channel (4) Addressing your lighting fixture Each lighting fixture has a unique address. This is so Cameo D4 knows which fixture it's controlling. In the example below, moving head.
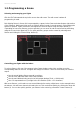
Cameo D4 / Quick Start 1.3.Programming a Scene Selecting and arranging your lights Click the EDIT tab towards the top left to access the edit screen. The edit screen is where all programming is made. Each lighting fixture in Cameo D4 is represented by a square in the fixtures window (bottom right section of the software). Multi-beam lights such as LED bars will be formed of several squares. Click and drag the squares to position. Lights can also be rearranged into common shapes using the shape wizard (1).
Cameo D4 / Quick Start Controlling your lights with the palettes The palettes allow for quick access to channel properties. Position a moving fixture with the Pan/Tilt grid, or set a color with the color wheel. Creating scenes and steps All programming in Cameo D4 is made with scenes and steps. Everything you set with the faders and palettes is saved to the selected step. A scene includes 1 or more steps. Each step can have a Fade Time and a Hold Time.
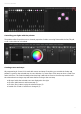
Cameo D4 / Quick Start Managing scenes New scenes can be created here (1) and groups can be created here (2). By default, you can play 1 scene per group at a time. We recommend organising different types of effects into different groups. For example, color effects, movement effects, beam effects etc.. This way, you can easily stack different effects together.
Cameo D4 / Quick Start Building effects The Cameo D4 effects engine allows you to program movements, color effects, beam effects and more-without the need to set each individual step and level manually. This speeds up programming dramatically and turns a basic show into something spectacular. There are 4 types of effects available each of which are described later on in the manual.
Cameo D4 / Quick Start 1.4.Controlling Live Triggering scenes Click the LIVE tab towards the top left to access the live screen. The live screen is where you control your show. The example below shows several scenes playing at the same time. As long as scenes use different channels, they will be stacked and merged together. If a scene is triggered which uses the same channels as a scene which is already playing, the latest scene will take priority over the others. Scenes can be displayed in 3 sizes.
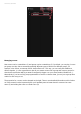
Cameo D4 / Quick Start The Reset buttons manage resetting live edits. For example, you could override a scene by selecting some fixtures and moving a fader, you could then reset this live edit by clicking on one of the 3 reset buttons. Sound to light Scenes can be synchronised with the BPM of the music, or follow the pulse of the music. Right click a scene and select 'BPM' or 'Pulse'.
Cameo D4 / Quick Start Using a MIDI controller Scenes and faders can be controlled with a MIDI console along with many other Cameo D4 features such as BPM tap, live snapshot and more. To pair a MIDI console: -Navigate to the software preferences (Cameo D4 -> Preferences on Mac, Edit -> Preferences on PC) -Select 'MIDI' on the left.
Cameo D4 / Quick Start Editing the interface The position, size and pairing of a control can be edited by clicking the edit button (1). Double click a control to open up the Control Editor. Here you can change the color, add some custom text and assign a custom icon. Other functions on the Show Bar include: screen lock fullscreen add a component manually Connecting with a smartphone or tablet The Show mode screen can be linked with an iPhone/iPad/Android smartphone or tablet.
Cameo D4 / Introduction 2.Introduction 2.1.What is DMX? DMX is a universal lighting control system. It stands for 'Digital multiplex' and is a digital data system which allows a DMX controller to take control of any DMX compatible device, regardless of the manufacturer. DMX devices are normally referred to as 'Fixtures' or 'Drivers'. Each fixture has a DMX input and a DMX output. Up to 32 fixtures can be daisy-chained. For connections of more than 32 fixtures, a DMX splitter must be used.
Cameo D4 / Introduction What's included? There are several tools included within Cameo D4: Cameo D4 : the lighting control software Easy View : a real-time 3D visualizer which allows you to plot a virtual stage allowing you to program your lights off-site Scan Library Editor : a tool which allows you to build SSL profiles (more on this in the Patch chapter) Hardware Manager : a DMX hardware maintenance tool which can be used to upgrade the firmware and set specific stand-alone settings such as the internal clo
Cameo D4 / Introduction 2.3.What's New in Cameo D4 has been re-designed from the ground up with a new user interface and available for both PC and Mac. Users of earlier software versions will find that we have kept all the important areas in the same place (patch, scenes, steps, fixtures, faders etc...). Here we will find out what's new in Cameo D4. The patch window has been integrated within the patch tab.
Cameo D4 / Introduction The editor tab now shows scenes in a grid view instead of a list view, allowing for more scenes to be visible at a time. The scene properties are now displayed in a way which is easier to read with a graphic to see a visual representation of the fade in and out times.
Cameo D4 / Introduction A new fixture window allows for easier group creation, fixture positioning and selection. The new XEEL (X-platform Effects Engine Library) gives access to hundreds of new effects including a Matrix effect tool which allows you to layer an effect on a rectangle and drag it over the top of your lights. Other features include audio effects and new curve shapes. The live screen has been cleaned up with the all new Live Toolbar designed for ease of use and touch screens.
Cameo D4 / Introduction The all new Show Mode replaces DVS (Cameo D4 Virtual Screen). Show mode allows you to quickly create a custom screen and use it on a touch screen, or send it to an iPhone/iPad or Android device. Pairing commands can be done simply by holding ALT and clicking on the part of the software you wish to link.
Cameo D4 / Patch 3.Patch 3.1.Fixture Profiles A fixture profile (often referred to as a Fixture Personality) is a file containing all information about a particular fixture. this includes: Fixture information - Number of channels, lamp type, name, number of beams Channel information - Gobo, Color, Pan/tilt, Shutter, Iris, Zoom etc… Preset information - presets are inside a channel. For example: gobo star, gobo line, gobo open C a m e o D 4 supports SSL2 fixture profiles.
Cameo D4 / Patch 8. 9. 10. 11. button is clicked within the fixture window) Patch Copy/Paste/Rename/Duplicate or Delete the selected fixture List View Dip switch view 3.3.Fixture Properties To modify how a particular fixture operates, click the ‘List View’ button. A list of all patched fixtures is displayed along with their DMX address, fixture name, channel name and fixture profile location. To view the channels used by a particular fixture, click the triangle to the left of the fixture’s address.
Cameo D4 / Patch 21
Cameo D4 / Edit 4.Edit 4.1.Arranging Lighting Fixtures Each lighting fixture is represented by a square which can be seen in the fixture window to the bottom right of the main window. Fixtures with multiple beams such as LED bars are displayed with several squares, each representing a beam.
Cameo D4 / Edit 3. 4. 5. 6. 7. Select all fixtures De-select all fixtures Select odd fixtures (1,3,5,7 etc…) Invert the selection Move the selection up and down by selecting the next and previous fixtures in the order they are defined within the patch window Fixture Index As fixtures are selected, a number appears at the bottom of the square. This is the fixture index. It’s important to select fixtures in the correct order when working with effects because effects are generated in the index order.
Cameo D4 / Edit Matrix Positioning When fixtures are positioned in a Matrix, they are positioned by default in the index order defined in the patch window from left to right and from top to bottom. Cameo D4 will also position the fixtures in the closest square possible. This fixture order can be changed by selecting ‘Advanced Positioning’.
Cameo D4 / Edit Groups Fixtures can be arranged into groups for quick selection. A group also stores the fixture index allowing several groups to be made with different index orders for different effect looks. To create a group, select the fixtures you wish to include within the group and click the + icon to the left of the fixture window. By default, the groups are labelled 1, 2, 3 etc.. To view the full name of the group, click the right arrow to expand the groups bar.
Cameo D4 / Edit click the % icon to the top left of the fader window (3). To jump to a preset (for example, a particular gobo), right click the top of the channel and select the preset from the list (4). Each channel can be turned ON and OFF by clicking the button at the bottom of the fader. If a channel is OFF, it will not be used in the scene. Therefore, if the same channel is being used in another active scene, the output value will remain the same.
Cameo D4 / Edit Creating Gradients and Linear Fans In addition to setting fixed values with the Palettes, it’s also possible to set a range of values across a selection of fixtures. For example a fan of beams can be set on a selection of moving fixtures, or a color gradient across an LED strip. In Cameo D4 we call these ‘Linea Fans’. To create a Linear Fan, select the the type of Fan from the dropdown list and then set the start and finish values. The image below shows how to create a fan of beams.
Cameo D4 / Edit 4.3.Creating Scenes When channels are set in the Editor, the values are stored in scenes. A Scene can hold a static ‘look’ (for example: all fixtures positioned in the centre of the room in red), or dynamic (for example: fixtures changing color with a rainbow effect). Scenes are arranged into Groups. By default, 1 scene can play at a time in each Group.
Cameo D4 / Edit Scene Properties The properties of the selected scene are displayed to the right of the editor window. Below is a description of each property. 1. Scene name : choose a name for your scene. The 3 buttons to the right clear the scene name, show and hide the scene on the LIVE tab, and allow the color of the scene button to be changed. 2. Loops : determine how many times a scene will play. If Loops is set to 1, the scene will play 1 time.
Cameo D4 / Edit 4.4.Creating Effects Cameo D4 includes a powerful effects generator called XEEL. The XEEL contains hundreds of effects which can be quickly applied to a selection of fixtures and generated into steps without having to add each step individually. To create an Effect: Select the fixtures you want to include within the effect Select from one of the 4 effect types Adjust the properties Click the ‘Generate’ button 1. 2. 3. 4. 5. 6.
Cameo D4 / Edit Curve With the curves effect, basic mathematical formulas can be used to adjust a channel. Curve types can be selected here(1). Channels can be selected here(2). In addition to controlling a specific channel, it’s also possible to put a curve on the overall brightness, hue and saturation of a lighting fixture. In the image below, the red color level is being adjusted with a sinus wave. The behaviour of the wave is adjusted with the faders.
Cameo D4 / Edit Open the light beam by clicking the Beam On button on the toolbar of the fixture window. This allows you to see your fixtures as you adjust the position. This will only be saved as part of the effect if ‘Include Set Levels’ is checked Select the shape you wish to create here(1) If you have a fixture with multiple beams, select the beam number here(2) Alter the shape by dragging the points(3).
Cameo D4 / Edit Matrix Matrix effects are video based effects designed to be pixel mapped. When a new matrix effect is created, it will appear within the fixture window on a rectangle. This rectangle can be dragged over lighting fixtures, resized and rotated. All effect types available within the pixel effect are available within the matrix effect, however a matrix effect doesn’t understand how many fixtures are being used, so effects such as chases and knight rider will not look as precise.
Cameo D4 / Live 5.Live 5.1.Controlling Your Show Live The live screen is where you control your show. The example below shows several scenes playing at the same time. As long as scenes use different channels, they will be stacked and merged together. If a scene is triggered which uses the same channels as a scene which is already playing, the latest scene will take priority over the others. Scenes can be displayed in 3 sizes.
Cameo D4 / Live The Live Bar The area to the right of the Live screen shows a Live bar along with a Master Dimmer. The master dimmer will override the dimmer and color channels of all your lights. It's a quick way to globally dim your full rig.
Cameo D4 / Live 5.2.Editing Your Show Live Everybody needs to edit their show live at some point, whether it be a temporary over-ride or adjusting the color inside a scene. There are several ways to control your show beyond playing the scenes. Jumping Back to the Editor If you click the editor tab whilst a show is running, the same scenes will remain activated and the show will go on. The only difference is that all channels used in the selected scene and step will over-ride the currently running show.
Cameo D4 / Live at the value you set until a scene which uses the same channel is triggered. LTP edits are not stored in scenes rather layered over the top of scenes. Live edits can be reset by clicking on one of the 3 Reset buttons on the live toolbar: All : resets all live edits in the show Family : resets all live edits on the selected family tab Select : resets all live edits on the selected fixtures Creating Snapshots A static snapshot of your show can be taken and saved within a new scene.
Cameo D4 / Live 5.3.MIDI MIDI stands for Musical Instrument Digital Interface and is a system which is used to communicate between different devices in the audio/visual industry. Many parts of the software can be controlled with a MIDI controller such as scenes and faders. MIDI devices are normally connected with a USB cable, or through a USB-MIDI interface with a DIN cable. Once your device has been connected and the drivers installed, the MIDI device can be selected from the Preferences window.
Cameo D4 / Live click a scene in live and select ‘Map to MIDI In’. The MIDI Triggering window will then appear. Pushing the corresponding button on the MIDI controller will automatically map the command. Advanced Button Mapping It’s possible to change the individual components of the MIDI message. The incoming MIDI message can be specified on the left and the outgoing MIDI message is specified on the right. Options include: Type : The type of MIDI message. Be careful with button release commands.
Cameo D4 / Live MIDI OUT Most of the time, the MIDI OUT value is the same as the MIDI IN. This is why when a command is auto learned, the software will learn the same message for both IN and OUT. However some controllers respond differently depending on their OUT value. For example, an AKAI APC Mini will change its button illumination color depending on the ‘On’ value received.
Cameo D4 / Live 5.4.DMX If your DMX interface has a DMX input connection, faders and scene may be triggered via a DMX input message. First of all, be sure that the correct connector on your interface is set as a DMX Input. This can be done within the Preferences.
Cameo D4 / Live properties window. Select the DMX universe and channel number. Values 0-127 will stop the scene and 128-255 will play the scene. Fader Mapping To map a DMX input to a fader, right click the fader and select ‘Map to DMX In’. Choose the DMX universe and channel number and click OK.
Cameo D4 / Live Several other areas of the software can be triggered by DMX. These can be located within the software Preferences. 5.5.Dry Contact Ports The software can be triggered by one of the 8 dry contact ports available on a compatible DMX interface. To map a port to a scene, select the scene and then click the Port trigger button within the scene properties window. An asterisk will be shown next to ports which have already been used.
Cameo D4 / Live Samples of Keypads - Storm 4 buttons (details and connections) See below for a complete description on where to order this keypad from and the components for the cable. We also explain how to make the connections. For more information visit www.storm-keypads.com Description Picture Ref. Storm Ref. Farnell Ref.
Cameo D4 / Live Touch keypads with snap-on keytops for custom legends (Storm Graphic Series) Pictures Components to buy to make the cable HE10 Connector female 10 pins (quantity 2) GS0402 01 102799 301-3885 Ref. Farnell Ref.
Cameo D4 / Live Ribbon cable (Quantity 1m or +) Connection to keypad 4 buttons 148011 246-8133 Here is the description of the connection. Connection to DMX interface Only 5 wires are required to use the 4 buttons of the keypad, but we advise to connect the 10 wires of the ribbon cable. Storm Interface - Keymat 14 Bentinck Court, Bentinck Road, West Drayton, UB7 7RQ, England Tel: +44 (0)1895 431421 Fax: +44 (0)1895 431132 Email: sales@keymat.
Cameo D4 / Live 5.7.Audio Scenes in Cameo D4 can be synchronised with the music BPM or Pulse. It’s possible to have some scenes following the pulse and others following the BPM.
Cameo D4 / Live There are several different BPM synchronisation options available: Audio - analyses the incoming audio signal to calculate the BPM (the audio input device can be selected below) Tap - a manual button which can be tapped to determine the BPM MIDI - reads 'MIDI clock' allowing you to read the BPM from many popular DJ software packages and mixers (the MIDI clock device must be selected in the software preferences) Pulse triggering Pulse will transmit a trigger each time the incoming audio lev
Cameo D4 / Live 49
Cameo D4 / Show 6.Show 6.1.Adding Controls to Show Mode Show mode is used to create a custom user interface for Cameo D4. It can then be displayed on an external monitor or in full screen. Show mode is ideal for installations and kiosks. To add a control to the Show Mode screen, hold alt and click the required button/fader/palette.
Cameo D4 / Show Add: Buttons, faders, pan/tilt grids and color wheels can be added manually by clicking the corresponding button and selecting the pairing. Editing Controls The properties of a control can be edited by double clicking. The Control Editor window allows you to make several changes: Custom Name : change the name of the control from the default name assigned Color : set the color of the control General : set the width/height of the control and set the label text color, size and position.
Cameo D4 / Show The association or pairing of a control can be edited by clicking ‘Edit Association’. The Association window appears with a list of commands. Several commands may be added so that one button can be used to trigger several different scenes or 1 fader can be used to control the speed of several scenes for example.
Cameo D4 / Show 6.2.iPhone/iPad/Android (Easy Remote app) Show mode can be controlled from an iPhone/iPad/Android device using the Easy Remote app which is free to download at the App/Play Store. To begin with, be sure that ‘Remote’ is enabled on the toolbar. When editing in Show mode, a white square will appear which represents the boundaries of the tablet or smartphone. Select your tablet or smartphone model from the combo box or manually enter the dimensions.
Cameo D4 / Show Buttons, faders, color wheels and pan/tilt grids are controlled in the same way as Cameo D4. If a show uses multiple pages, navigate between the pages by swiping left and right in an empty space, or by tapping one of the dots at the top. The custom screen is updated automatically as changes are made in Cameo D4. To refresh the screen at any time, tap the ‘lock’ button in the top right and then tap the ‘refresh’ button. Tap the ‘back’ button to return to the device menu.
Cameo D4 / Other Information 7.Other Information 7.1.DMX Recording Cameo D4 can record an incoming DMX signal with a compatible DMX interface. The recorded data can then be compressed and written to a scene. To record DMX, at least 1 DMX Input must be activated within the Preferences. The DMX Recorder can be found in the ‘Tools’ menu. DMX can be recorded by selecting the input device from the combo box (1) and then clicking record (2).
Cameo D4 / Other Information Read : takes the show from the device and loads it into Cameo D4. Note that on devices with limited memory, only essential information is saved therefore reading the memory should only be used if the .dvc file has been lost. For example, scene names may not be recalled. Test : sets the DMX interface to Stand Alone mode allowing for the Stand Alone show to be tested. Clear Memory : erases all written scenes from the memory.
Cameo D4 / Other Information Time Triggering Some interfaces include a clock and calendar allowing a scene to be automatically recalled at a certain time of day or a certain day or date when the device is in Stand Alone mode. To add a time trigger to a scene, right click the scene in the Stand Alone window and select ‘Time Trigger’. There are 3 ways to trigger a scene : Appointed time : set a time of the day when a scene is triggered.
Cameo D4 / Other Information 7.3.DMX & Art-Net Devices Cameo D4 is cable of sending and receiving DMX from several different devices simultaneously. These can be configured within the Preferences window.
Cameo D4 / Other Information By default, Cameo D4 will send the Art-Net data to the IP address of the Art-Net device. Messages can also be broadcast across the entire network by clicking on the ‘Broadcast’ checkbox. Art-Net devices can also be added manually by clicking ‘Add Virtual Device’ and entering the name, IP Address and Mask. 7.4.Hardware Manager Further information on the hardware, including the Hardware Manager can be found within the online hardware manual.