
Instructions


17
DEUTSCH ENGLISH
DMX
FRANCAIS
ESPAÑOLITALIANO POLSKI
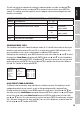
This will take you to the submenu for setting the submenu options (see table, use and to
select, press ENTER to confirm, use and to change the value or status, press ENTER to
confirm). The settings are made separately for each loop and are retained even after restarting the
device.
STANDALONE MODE LOOP (Loop 1–4)
Dimmer Sets brightness 0–100
Step time Sets step time 0.1 s to 10.0 s
Fade time Sets fade time in percent 0% to 100%
Delay Delay time for slave groups 0.0 s to 2.0 s
1st step 15 colors from Color Preset Red to CW (Cold White)
4 colors from User Color User 1 to User 4
Blackout Blackout
2nd step " "
3rd step
15 colors from Color Preset Red to CW (Cold White)
4 colors from User Color User 1 to User 4
Blackout Blackout
------- Skip step
4th step " "
SLAVE MODE
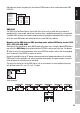
Standard Slave mode: Starting from the main display, press MENU to go to the main menu.
Using the and buttons, now select the Slave menu option, press ENTER to confirm your
selection, then select Slave Group 0, and press enter once again to confirm. Connect the slave
and master unit (same model, same software version) using a DMX cable, and activate one of the
stand-alone modes on the master unit (Auto, Static, Color Preset, User Color, Loop). The slave unit
will now follow the master unit precisely.
--------Menu-------
DMX Address
DMX Mode
DMX Delay
Stand Alone
Slave
Settings
System Info
----Slave Group----
Stand Alone
Slave
Settings
Mode
Slave
0
Main display
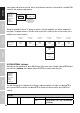
Advanced slave mode: If you want to control the slave units in master/slave mode using
one of the stand-alone modes Auto or Loop, the control signal can be reproduced with a time
delay of up to 15 levels. The delay time can be set in the Delay submenu option in the respective
stand-alone mode, and the delay factor for the corresponding slave unit can be set in the slave
menu. This allows a chaser light effect to be easily created with any number of spotlights of the