Camec 4 Seasons Evolution 500 x 700 Part No. 044483 Installation Guidelines Ver.
Components Supplied in Carton Exterior Assembly* Interior Trim * 8 M6x45 Bolts* Interior Bracket* User Manual* or 8 M6x65 Bolts* NOTE:- ITEMS NOTED* MUST BE USED OR WARRANTY MAY BE VOID Tools required Power drill or equivalent with 5mm Hex Bit or Allen Key Wiring crimps and insulation Neutral Cure Silicone Sealant (Non Acetic) Cleaning / Degreasing Fluid The following is a list of all spare parts: Description 4 SEASONS EVOLUTION HATCH FLYSCREEN 4 SEASONS EVOLUTION HATCH FLYSCREEN
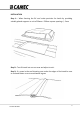
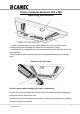
INSTALLATION Step 1: When framing the RV roof make provision for hatch by providing suitably placed supports to suit a 500mm x 700mm square opening +/ 2mm Step 2: Test fit hatch into cut out area and adjust to suit.
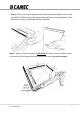
Step 4: Clean roof surface approximately 50mm around the edge of the already cut 500mm x 700mm hole and around flange periphery using Isopropanol / Wax and Grease remover / Methylated Spirits or similar. Step 5: Apply a continuous bead of Non Acetic silicone a minimum of 6mm wide to the centre of the flange all the way around the hatch. Do not over apply.
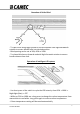
Step 6: Select correct bolt length based on the thickness of your roof Roof Thickness 25mm – 50mm 50mm – 70mm Mounting Bolt Usage M6 x 45mm (Qty) 8 M6 x 65mm (Qty) 8 Step 7: Join the Intelligent LED wiring from the hatch to the RV’s 12VDC power source and insulate the connections. Step 8: Hold bracket loosely in place and tighten by hand two opposing bolts. With power drill add remaining bolts and then tighten all 8. Use the lowest torque setting being careful not to over tighten.
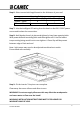
Camec 4 Seasons Evolution 500 x 700 Operating Instructions: To open ventilation ports on the hatch gently twist one of the four knobs clockwise until corresponding flap opens (Anticlockwise to close). If cooking with a gas appliance it is recommended that hatch flaps be left in the open position. Care should be taken to ensure flaps are closed before departing and driving away. Removal of the Flyscreens Periodic removal and cleaning of flyscreens is mandatory.
Operation of Roller Blind To open move using finger pocket of the blind handle. Add slight backwards rotation to ensure handle locks into desired position. Blind opening can be set at 30%, 60% or 100% To release blind move forwards and add slight forwards rotation to ensure handle releases from lock.