
Installation and Operating Instructions


TOOLS REQUIRED:
• Electric Drill and 5/16” Drill Bit
• Phillips Screw Driver
• Adjustable (Crescent style) wrench
• Socket and Driver
MATERIALS REQUIRED
• Winch and Anchor Roller (davit included)
• Seven bolts, washers and nuts (included)
• Shackle for anchor attachment (included)
• River or Mushroom anchor (not included)
• Battery Wire and Circuit Breaker (included)
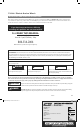
INSTALLING ANCHOR WINCH ON BOAT DECK
1. Position Winch and Davit on boat deck in desired location. Anchor roller must extend over edge to allow anchor to clear the deck. Davit roller must be in alignment
with rope spool for proper operation.
2. Look below the deck and conrm there are no obstructions. Surface mount “Isolator Bolts” may
be used (sold separately) where no access is available under deck.
3. Remove plastic housing from winch and disconnect switch connector.
4. On davit housing, remove rear two screws (black arrow in FIG 1). Loosen, but do not remove pivot
screws (white arrow in FIG 1). Rotate plastic cover, FIG 2.
5. If Davit and Winch can be bolted together (FIG 3), then only ve bolts are required for installation
(Black arrows in FIG 4).
6. Mark the holes to be drilled on boat deck.
7. If battery wire is routed thru boat deck, mark hole for drilling.
8. Remove Davit and Winch. Drill holes.
9. Place the Davit and Winch in position, bolt to deck. Consider underdeck reinforcement such as marine plywood for greater strength.
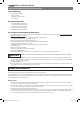
CAUTION
Keep wires away from intense heat and never attach circuit breaker to negative terminal of the battery.
10.
Route battery wires. Connect RED positive (+) wire to silver terminal on the circuit breaker and tighten nut. On the copper colored circuit breaker terminal, attach
the buss bar (brass stamped part) using the small hole and tighten nut. Attach the buss bar (larger hole) to the (+) Positive battery positive terminal. Attach BLACK
negative (-) wire to battery negative terminal.
11. Install Davit and Winch Covers.
12. Attach river or mushroom type anchor, up to 25 lb anchor is recommended. Do not exceed 30 lb weight or winch damage may occur over time. Use a lighter anchor
when possible. Attach rope to anchor shackle and shackle to anchor shank eye.
ANCHOR WINCH OPERATION
To lower the anchor press/hold button with arrow which points down. Release button when you wish to stop letting rope out. To raise anchor, press/hold button with arrow
that points UP. Release button when anchor is docked or when you wish to stop retrieval of the anchor.
To use the AutoDeploy feature, press and release the AutoDeploy button. The winch will deploy the anchor, letting rope out until the rope becomes slack. As the boat drifts
and pulls on the anchor rope, more rope will be let out a little at a time. To stop letting rope out, simply press the Lock or AutoDeploy button again. Pressing any button will
also stop the AutoDeploy feature from letting rope out.
Helpful hints:
1. When the anchor seems to reach the lake or river bottom, allow the winch to slowly release additional rope until the boat begins to hold its position. If too much
rope is let out too quickly, the rope could tangle in the winch housing.
2. If you are in 20 feet of water, you may need 60 feet of rope to hold in wind or current. The ratio of rope length to depth is called scope and a scope of 5 to 1 is common
in wind or current. The more scope, or anchor line out, the better the anchor will hold.
3. Using more scope (more line out) is better than using a heavier anchor.
4. This winch includes an automatic resetting circuit breaker. In the case of a short circuit, or if the winch motor is stalled, the circuit breaker will cut power to the winch,
and it will automatically reset after about one minute. The circuit breaker is a required component with this winch. Failure to use the Circuit Breaker will void the
warranty and may result in winch failure and possible risk of re if inadequate wire and circuit protection is used.
INSTALLATION AND OPERATING INSTRUCTIONS
T10208 Electric Anchor Winch
895237 69004 Angler 30 G3 instructions.indd 3895237 69004 Angler 30 G3 instructions.indd 3 8/24/20 11:00 AM8/24/20 11:00 AM