
User's Manual
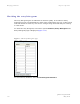


Table Of Contents
- PTP 250 User Guide
- Copyrights
- Safety and regulatory information
- Contents
- List of Figures
- List of Tables
- About This User Guide
- Chapter 1 Product description
- Chapter 2 Planning considerations
- Chapter 3 Legal information
- Chapter 4 Reference information
- Chapter 5 Installation
- Chapter 6 Configuration and alignment
- Chapter 7 Operation
- Chapter 8 Troubleshooting
- Testing link end hardware
- Testing when PoE LEDs do not illuminate correctly
- Testing after a lightning strike
- Test flowcharts
- AC LED is off
- AC LED is flashing
- PORT LED is off
- PORT LED is flashing
- Test Ethernet packet errors reported by ODU
- Test Ethernet packet errors reported by managed switch or router
- Test ping packet loss
- Test resistance at the PoE end of the drop cable
- Testing the radio link
- Testing link end hardware
- Glossary

PTP 250 User Guide Restoring, resetting and rebooting
phn-2182_002v000
May 2011
7-25
Resetting to default configuration (without country reset)
Use the Save & Restore page to reset the unit to factory default configuration, without
resetting the country of operation (selected at first login).
CAUTION
When the unit is reset to default configuration, the current configuration is
lost and the unit reboots, causing loss of service.
NOTE
To reset the unit to factory default configuration, including reset of the
country that was selected at first login, follow the procedure in Resetting to
def
ault configuration (with country reset) on page 7-26.
To re
set to default configuration without country reset, proceed as follows:
1
Select menu option Configuration, Save And Restore. The Save &
Restore page is displayed (Figure 6-11).
2
Select Reset to Default Configuration and Yes to confirm.
3
Wait for at least 45 seconds.
4
The unit should now be reset to partial factory default settings, including
the following:
Password ‘motorola’,
IP address ‘169.254.1.1’,
Master Slave Status ‘Slave’.
The Country Code (selected at first login) remains unchanged.
5
To reconfigure the unit, follow the instructions in Connecting to the unit
on page 6-3 an
d Using the installation wizard on page 6-14.
NOTE
When logging into the unit, change Password (this will be prompted).