
User's Guide Part 2


User Guide: PTP 600 Series Installing the GPS receiver for PTP-SYNC
phn-0896_009v003
Feb 2010
UNDER DEVELOPMENT
5-33
5
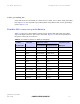
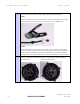
Insert the eight contacts into the connector body in accordance with
Table 5-1.
It is easiest to insert the pins from the inside out, in the order 12, 11, 9, 5, 4, 3, 2,
1. Push the contacts in so that the shoulder on the contact fits into the hole in the
connector shell. When all contacts have been fitted, pushed them in further to
engage with the locking mechanism in the connector shell. This can be done by
applying pressure to the contact with a small diameter stiff object, such as
tweezers.
If a contact is pushed in to the point where the locking mechanism engages
before all of the contacts have been inserted it will limit the amount of room
available to fit the remaining contacts, requiring harder bends to be applied.
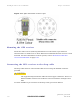
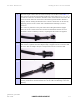
6
Fit the adaptor to the connector shell. The plastic ring fits inside the rubber boot
and ensures a tight fit when the adaptor body is clipped onto the connector shell.
Be aware that the adaptor body is a hard push fit onto the connector shell.
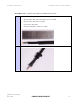
7
Fit the strain relief clip.
8
Connect the adapter to the GPS, then wrap a layer of self-amalgamating tape,
starting 25mm below the bared back outer of the cable and finishing at the GPS
housing.